Tag Archives: CCHRC

How does a rainwater catchment system work and can I install one myself?

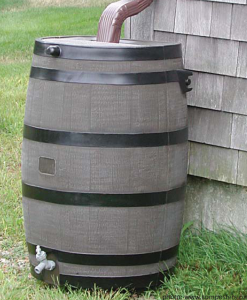
A simple do-it-yourself rainwater catchment system.

Installing a rain barrel to collect rainwater for non- potable uses is an easy way to help the environment and save money. Water collection systems can be as simple as a rain gutter directed into a barrel or as sophisticated as a buried tank supplied by multiple sources with filtration and pump systems. The easiest way to collect rainwater is to catch it as it drops from your roof and eaves. Of course, this works best if your home has large roofs fitted with gutters, but even a small roof can collect significant amounts of rain.

For every square foot of roof, you can collect a little more than a half-gallon of water per inch of rainfall. Fairbanks has an average of 10 inches of rainfall a year (some years much more, others much less). This means a small cabin in Fairbanks with a 1,000-square-foot roof can collect about 5,000 gallons of water per year–more if you collect snowmelt in the spring.

One thing you need is a tank. Storage tanks can be fiberglass, wood, steel, concrete, plastic, or another material, though plastic tanks are by far the most prevalent in Alaska. If the system will store water during the cold seasons, then outdoor tanks and lines need to be insulated to protect from freezing. Buried tanks should be at least four feet below-grade and are often protected by a top layer of insulation to prevent freezing.

You can often find small above-ground storage vessels at feed stores, or companies that deal in fuel storage, which sell everything from 15 gallon-60 gallon plastic barrels, some with spigots and some without. You may be able to purchase a much larger used tank from local excavation companies (the professionals who install domestic water holding tanks and septic systems) as they replace underground storage systems from time to time. Large new tanks can be found at plumbing stores, excavation companies, or local tank manufacturers.

A basic cistern system involves a series of gutters and downspouts that converge at a centralized collection point that in turn leads into the tank. If the tank is above ground, it may be beneficial if it is fitted with a drain valve and an overflow diverter. Provided the tank is elevated above the demand source, you can use a gravity-fed system to move water. If the tank has access from above, you may be able to move water with a submersible pump attached to a hose. The pump will provide more pressure and a consistent flow rate. Over time, the tank will fill with sediment, which will require cleaning periodically. Also, it’s a good idea to empty and clean the tank each year. This will help control algae growth, but also prevent damage due to freezing in winter. Be sure you support the tank adequately – just one gallon of water weighs around 8 pounds.

In general, the natural process by which rainwater is formed causes it to run slightly higher in acidity. In addition, the characteristics of your particular rainwater can be affected by sulfur and other pollutants in the air (if present), your roofing material, and any debris that may collect in the catchment system such as leaves, pollen, and bird droppings, for example. Downspouts, gutters, or the tank’s opening can be fitted with screens to keep large debris out of the system. More advanced systems include a trap to minimize unwanted matter from getting into your main tank. A trap is basically a smaller tank containing baffles. Water enters this smaller tank first and filters out sediment and other materials. You may want a system for diverting water from the collection system until a good rain has had chance to wash your roof of heavy pollen or other accumulations.

Consider what your roof is made of and ask the manufacturer to make sure your roofing materials are not toxic. It’s possible that old roofs may use asbestos shingles or other toxic materials.

If you’re considering a permanent catchment water distribution system, the acidity of the rainwater may need to be adjusted to reduce the long-term corrosive effects of the water on metal plumbing components.

If you are looking into building an advanced water catchment system, consider going just a few steps farther. Fitted with additional filters and plumbing, a cistern can provide grey water for indoor use and in some cases, drinking water.

For information on designing a system, check these resources:
Rain Barrel Construction by Cold Climate Housing Research Center, GW Scientific, City of Fairbanks, and Fairbanks Soil & Water Conservation District: http://cchrc.org/docs/green_inf/Rain_Barrel.pdf
Water Cistern Construction for Small Houses by UAF Cooperative Extensive Service: http://www.uaf.edu/files/ces/publications-db/catalog/eeh/HCM-01557.pdf
Information on Best Management Practices for rainwater catchment in Alaska: http://cchrc.org/docs/best_practices/BMPRWcatchment.pdf
Other ways to reduce rainwater and pollutant runoff on our website at http://cchrc.org/green-infrastructure.

How do I know if my boiler (or furnace) is the correct size for my house?

If you are thinking about purchasing a new boiler (or any other heating appliance) in the near future, make sure that you get one that is the optimal size for your house. Correctly sized boilers operate more efficiently and are able to keep your house at a comfortable temperature. A boiler that is too small will not be able to produce enough heat in the winter months, and a boiler that is too large will cycle on and off, wasting fuel, just like a car driving in stop-and-go traffic. Here are 3 ways to know if your current boiler is the correct size:

1) The rule-of-thumb: On the coldest day of the year, your boiler should run pretty much non-stop to keep the set temperature. Think of it as a car driving on the highway, getting a high miles-per-gallon since it doesn’t have to start and stop. If it does run non-stop, but your house does not stay warm, then the boiler is undersized. On the other hand, if you find your boiler cycling on and off during January’s coldest week, then you should consider getting a smaller boiler.

2) The calculations method: To determine what size of a heating appliance you will need, in addition to finding out information about what other energy upgrades you can make to your house, consider signing up for an energy rating. An energy rater will look at your entire house, measuring the air leakage rate with depressurization from doors and windows, checking insulation levels, assessing your heating system and checking for drafts. They will input this information into AKWarm, software maintained by the Alaska Housing Finance Corporation that calculates energy ratings. In a few weeks, you will receive the rating in the mail. It includes ways to improve the rating and other information on your house, such as the heating needs. An energy rating typically costs between $425-$550, but this will be rebated if you participate in the Home Energy Rebate Program (though you will likely face a waitlist for the rating). Visit the Alaska Housing Finance Corporation website for information on the rebate program and signing up for a rating: www.akrebate.com.

3) Do-it-yourself: The rating software AKWarm is available for free online. If you are computer-savvy and have a few hours to gather information on your house, you can use AKWarm to calculate your own unofficial energy rating. The software is available for download here: www.analysisnorth.com/AKWarm/AKWarm2download.html.

Framing, Floors & Slabs

We’ve made a lot of progress on the Sustainable Village this week—framed the first floor of the northwest house, started building the deck for the second floor, and poured concrete slabs for the two east homes.

The first floor of the first house was framed in a day. The 1,500-square-foot home has four bedrooms, a downstairs bathroom, upstairs kitchen, and big south-facing deck on the second story.

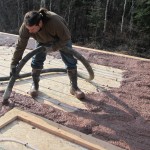
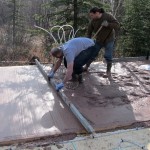
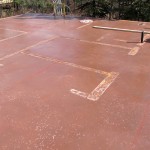
The beginning of the week was cold with scattered showers, so the concrete contractors waited until Thursday and Friday to pour slabs. The process took about two hours—the mixing truck and the pumping truck showed up and one of the guys poured the coloring (Santa Fe) into the mix. Then five guys worked together on the floor, spreading the “mud” from a rubber hose, moving it around with “mud sticks,” leveling the slab with a screed (or flat board), and smoothing and sealing it with a bull float (a long-handled tool with an aluminum float). Once the slab set up a bit, they went over it with a trowel (a flat, metal-bladed hand tool), which gets rid of any bumps and gives it a smooth finish. The slab is 1.5 inches with a pretty adobe color.

The crew is currently framing the second story. Next week students begin helping out on site.

Spray Foaming the Foundations

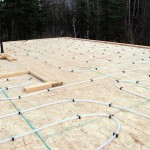
Two of the homes will have insulated raft foundations. This allows the house to rest directly on the ground, keeping the floor warmer than if it were elevated on piles. A thick mat of spray foam is designed to prevent heat loss from affecting the frozen ground, and a cooling system was also installed in the gravel pad to chill the soils if needed.

Sustainable Village: Laying Foundations

CCHRC is demonstrating an innovative foundation design at the Sustainable Village. Two of the homes, sitting on permafrost about 9 feet deep, will be built on steel piles, a common method for building on frozen ground. The other two, situated on stabler soil, will have an insulated mat foundation.

Builders laid the mat foundations last week. They include a geotextile mat placed directly on the soil with several feet of gravel on top. PVC pipes are embedded in the gravel in a grid formation as a backup cooling system. Resting on the pad is a steel floor assembly. Spray foam was applied against the entire system for a monolithic layer of insulation at least 10 inches thick. This is designed to prevent heat from inside from transferring to the ground. Temperature sensors were strung about 10 feet down into the soil to monitor any changes. If needed, cold air could be circulated through the piping system in the winter to lower the temperature, as insurance against shifting ground.

Here’s a look at the pad preparation.

Groundbreaking for the UAF Sustainable Village

The UAF Sustainable Village broke ground on Friday, April 6 on lower campus near the Cold Climate Housing Research Center.

The development will feature innovations in cold climate construction—with super-insulated building envelopes to minimize heat demand—as well as experimental approaches to energy, ventilation and wastewater treatment. The homes will serve not just as student residences but also as housing prototypes, building science labs, and teaching tools.

UAF students helped CCHRC develop the concept for the homes, through a design contest, and will help build and conduct research on the Village as well.

“The thing that’s unique about this project is it’s engaging students for the first time in the development of sustainable housing,” said Michele Hébert, who heads the UAF Office of Sustainability. “Our hope is that this will lead to more young people learning how to live sustainably and be future leaders in sustainability.”

The 1,500-square-foot homes will have an R-50-60 envelope and will use a mix of solar, biomass and conventional fuel. A 14 kw photovoltaic array was funded by the university sustainability grant.

The project will demonstrate that a highly energy efficient 4-bedroom home can be built in Fairbanks without breaking the bank. The budget is approximately $200,000 per home. The rent will approximate the cost of a mortgage for an equivalent new single-family home in Fairbanks and be competitive with dorm rates.

Construction will be done by seasoned carpenters along with UAF student workers. Student residents move in in mid-August, so we will be busy for the next few months!

Bethel school harnesses resources to save money

CCHRC is working with an education center in Bethel to help improve the energy performance of its new building.

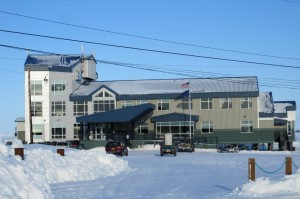
Yuut Elitnaurviat is a vocational center that offers training in construction, health care, dental health aid, and other subjects for residents of the Yukon-Kuskokwim Delta region.

The new building at Yuut Elitnaurviat campus consumes more than 40 percent more than the average building in Alaska.

The school is spending more than 40 percent more than the average commercial building in Alaska for heating and power at its facilities—which includes a classroom, admin offices, a cafeteria, dormitory and shop—and the building is only a few years old. This stems from inefficiencies in heating, lighting, and ventilation systems, among others. For example, the air handling system is consuming more than its fair share of energy use and may be oversized for the building. In addition, the school is paying to heat much more domestic hot water than it actually needs.

CCHRC researchers visited the campus in March to explore options for improving the building’s performance.

“They’re paying almost 50 cents a kWh, and they’re using around 32,000 kWh a month, so it makes more economic sense to focus on the electric load than on space heating at this point,” said CCHRC research engineer Bruno Grunau.

CCHRC prepared a feasibility study of the local resources and found both wind and solar photovoltaic systems would be viable technologies. Researchers are now helping school officials plan a small wind farm and solar array. The wind farm could include up to 4-5 turbines, each producing approximately 6,000-10,000 kWh per year, and a 10 kW PV array that would produce approximately 8,500 kWh a year.

Building officials are also pursuing a commercial energy audit to find other economical ways to save energy, such as tightening the building envelope or installing high-efficiency lighting and daylight sensing.


The UAF Sustainable Village: drilling, design, and detailing

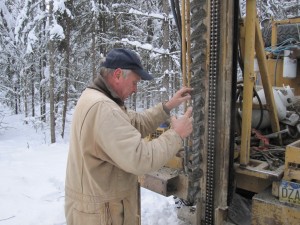
Two boreholes were drilled to take soil samples at the Sustainable Village building site.

The University of Alaska Fairbanks (UAF) and the Cold Climate Housing Research Center are gearing up to break ground on the UAF Sustainable Village, a super-efficient campus housing project planned for this summer. CCHRC designers have developed the building form and floorplan as well as the envelope and foundation design.

Site clearing of four lots took place in November, and UAF scientists drilled two 30-foot boreholes for a soils analysis in February. The west site revealed strong, stable soils, with silt and gravelly sand, while the east site revealed marginal soils with six feet of silt and peat on top, then three feet of ice-rich silt, and below that fine sand and gravelly sand. “The east site will be the best place to test some innovative foundations,” said CCHRC designer Aaron Cooke.

Now the team is focused on structural engineering, construction detailing, and planning mechanical, electrical, plumbing, and other systems.

Meanwhile, students are involved in the project at many levels—creating cost analyses for renewable energy systems, helping CCHRC with the foundation design, and setting up a social study of the Village.


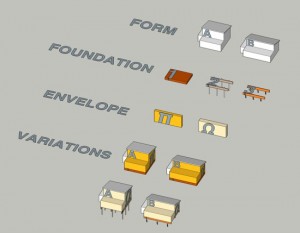
The four houses will demonstrate various combinations of foundations, envelopes, and form.


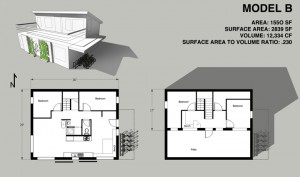
Concept and floorplan for two of the four homes.