Tag Archives: cold climate housing research center

What is stack effect and how does it affect your home?


How does stack effect work? See for yourself.
 

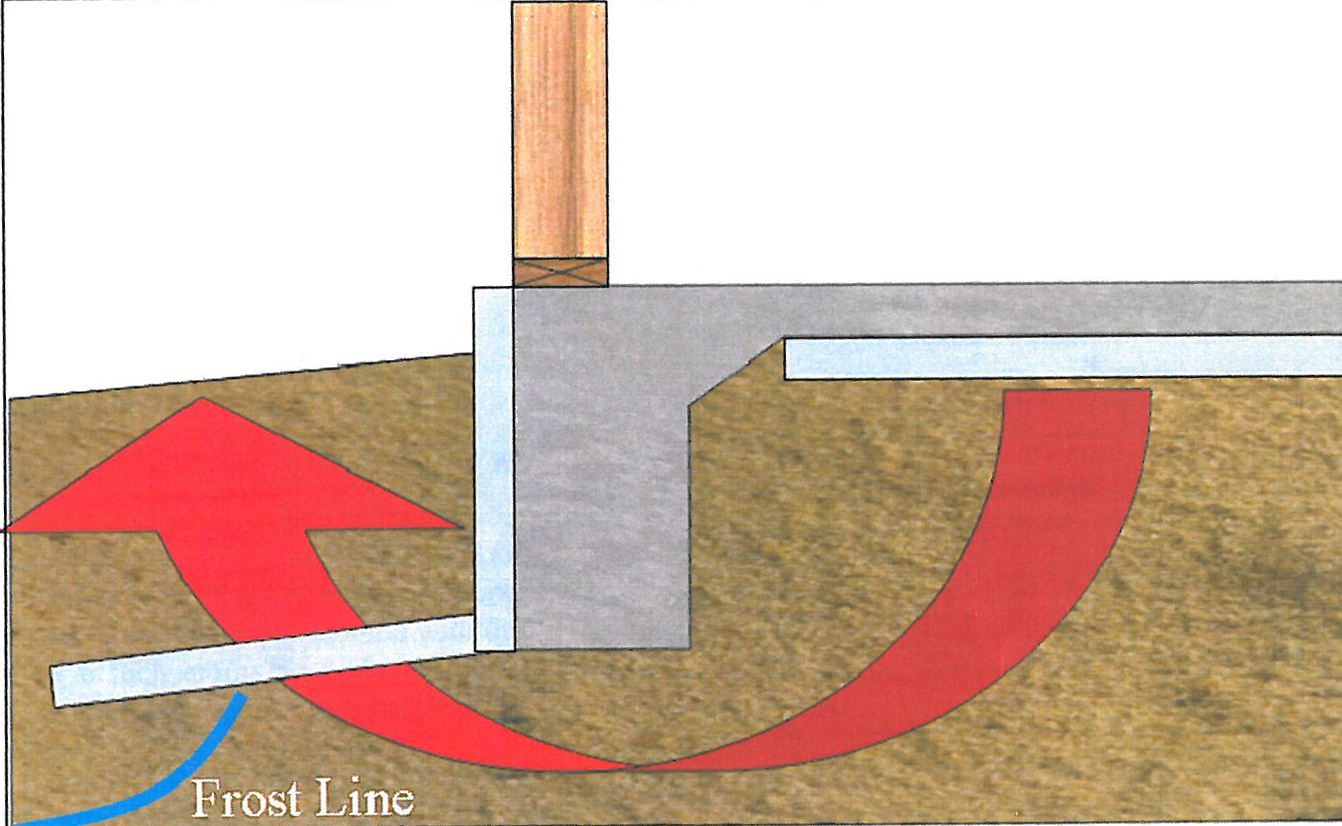
Stack effect (also called chimney effect) involves airflow into and out of a building caused by indoor and outdoor air temperature differences Everything starts with the fact that warm air rises and cold air sinks. In winter, your house acts much like a bubble of warm, buoyant air sitting on the bottom of a sea of cold, dense air. This creates a pressure difference, one of the key factors you need in order to have air flow. The actual distribution of pressures inside the house can vary, but generally the pressure is positive toward the top floors and ceiling (meaning air wants to escape outside) and negative towards the bottom floor (meaning air wants to come in). To complicate matters, a taller structure such as a multi-story house will contain a taller column of air that will produce greater pressure differences.

The other key factor allowing for airflow is a pathway for the air to move between the regions of differing pressures, which in your house means leaks in your building envelope. Things are fine if you have no air leaks, but even the tightest homes have some air leaks. As warm indoor air leaks through the walls or roof, it cools and deposits moisture along the way. The problems don’t necessarily stop there, however. New air to replace the air lost must come from somewhere.  Replacement air will tend to take the path of least resistance. Typically air is drawn in through the lowest regions (the negative pressure zone) of the house, which is why problems with soils gases, such as radon, tend to increase in winter. Replacement air isn’t always just drawn in through the lower parts of the structure.  Air can also infiltrate through poorly sealed or malfunctioning combustion appliances such as wood stoves and boilers, or plumbing traps that have dried out and are therefore no longer able to provide an air seal to the septic system.

The key to reducing potential problems with stack effect is good air sealing around penetrations in the building.  If you are considering sealing air leaks in your house, it’s very important that you start at the top.  If you start at the bottom, then you might be increasing the chances that air leaking out of the top will pull air from other sources such as combustion appliances.  Some common air leakage points in the positive pressure zone of the house (if not properly air sealed) can include:  can lights, chimneys, plumbing vents, wiring penetrations, bath fans, and range vents.  Always be sure that you have a functioning carbon monoxide detector in your home and that your boiler and wood stove have a dedicated source of combustion air.

Arctic Wall is a new energy efficient construction option in the Interior

The Arctic Wall is an airtight double-wall system using cellulose insulation and is designed to allow water vapor to diffuse through the wall.

The Arctic Wall is an airtight double-wall system using cellulose insulation and is designed to allow water vapor to diffuse through the wall.

CCHRC recently tested a wall construction technique in the Interior that provides very high levels of insulation to maximize energy efficiency. The Arctic Wall is an airtight double-wall system using cellulose insulation and is designed to allow water vapor to diffuse through the wall.

The system was designed by Fairbanks builder Thorsten Chlupp and uses some of the principles of the REMOTE wall—another super-insulated building technique that places the majority of the insulation outside the load-bearing wall.

Conventional cold climate construction calls for a vapor retarder on the warm side of the exterior wall.   This vapor retarder typically consists of a layer of tightly air-sealed 6 mil polyethylene plastic sheeting, which keeps water vapor generated in the living space in winter time from getting into the exterior wall cavities.  Installing a traditional plastic vapor retarder properly requires a high level of detail around all penetrations to prevent air and moisture movement through the wall assembly. This is a known weak spot for conventional cold climate construction.

The Arctic Wall, on the other hand, has no plastic vapor retarder. Instead of stopping moisture movement with a barrier membrane, it works by remaining permeable so water vapor can move through the wall with the seasons, creating a super-insulated wall that can also “breathe”.

The key components of the Arctic Wall include:

  • an extremely tight building envelope to prevent air leakage and moisture transport via air leakage through the wall
  • the majority of the insulation outside the structural framing and air barrier
  • a wall that is open to water vapor diffusion that has enough capacity within the insulation to absorb and release a heating season’s worth of water vapor without succumbing to moisture damage

Chlupp’s system under study by CCHRC contains a 2×6 interior structural wall filled with blown-in cellulose with taped sheathing and a vapor-permeable air barrier (Tyvek HomeWrap) wrapped on the outside of that sheathing. Spaced a given distance depending on desired insulation thickness from the 2×6 inner structural wall, a 2×4 exterior wall is installed and wrapped around the outside with another air barrier membrane.   The space between the two walls is then filled with 12 more inches of blown-in cellulose. See diagram for details.   Depending on thickness, a superinsulated wall of this type can attain R-values of 70 or more, more than three times a traditional 2×6 wall system,

CCHRC monitored the Arctic Wall’s performance over 13 months by placing temperature, moisture and relative humidity sensors in the walls.  The goal was to determine whether the conditions would support mold growth, and how moisture would move through the walls.

Test results indicated that both temperature and relative humidity levels in the walls were not sufficient to support mold growth. Neither side of the air barrier covering the exterior of the 2×6 structural wall ever approached the dew point (the point at which vapor condenses to water), indicating the structural framing is well protected from moisture.

The relative humidity of the bathroom wall (the one likely to see the most moisture) never exceeded 65%,  staying well below the risk level for mold growth.

CCHRC also used moisture modeling software to predict how the walls would perform over a 9-year period, which showed that humidity levels and moisture content within the walls should not reach a level where mold growth would be a concern.

Also noteworthy was the direction of moisture transport in the Arctic Wall—walls dried to the inside in the summer and to the outside in the winter. This is not possible with conventional cold climate construction.

The Arctic Wall is a specific system whose components must be carefully engineered and built to ensure proper performance and moisture management.  Based on CCHRC testing, the Arctic wall has done very well in Interior Alaska and provides a new option for a super-insulated house design.

Read the snapshot and full report on the CCHRC website at http://cchrc.org/arctic-wall

New videos on mitigating radon in your home

How to mitigate radon in new construction

The hilly areas containing fractured schist and rock around Fairbanks are known for having high concentrations of radon. A good radon mitigation system will ensure healthy indoor air quality. Your single best chance at dealing with radon issues is during new construction.

In this video, Ilya Benesch, building educator at the Cold Climate Housing Research Center, demonstrates the essential steps of installing a radon mitigation system for a slab-on-grade foundation.

The video follows EPA guidelines for installing radon mitigation systems found here:

http://www.epa.gov/radon/pdfs/buildradonout.pdf


Examining a radon mitigation system

In this video, Ilya Benesch visits a construction site and explores how the contractor has installed a radon mitigation system.


The project was funded by the University of Alaska Fairbanks Cooperative Extension Service. For more information about radon, visit: www.uaf.edu/ces/energy/radon.


Do low-flow showerheads and faucets save money?

Photo by EPA

Photo by EPA

The “rule of threes” highlights the basic necessities of life: The typical human can survive 3 minutes with no air, 3 hours in a harsh environment with no shelter, 3 days with no water, and 3 weeks without food.  Not pleasant to think about, but it does make you consider how you fulfill these needs on a daily basis.  And while Alaskans are fortunate to have access to an abundance of water – the Alaska Department of Fish and Game reports that Alaska contains more than 40% of the nation’s surface water resources in its thousands of rivers and millions of lakes – getting access to clean water every day can be no small task.  In Fairbanks, many people pay for water delivery, or haul water themselves, no easy chore in below freezing temperatures. Additionally, many people heat water for laundry, showers and dishes, which adds to household energy costs.

In order to save both water and energy, many people turn to low-flow showerheads and faucets in their homes. Low-flow devices reduce the water coming from a faucet but add pressure to the remaining flow, so people don’t notice the overall loss in water volume. These devices save money in two ways.  First, they reduce water usage.  If you pay for city water, water delivery, or for gas to haul your own water, using less water means saving money.  Secondly, the majority of homes have a water heater to provide hot water for showers, dishes, and laundry.  A low-flow device saves you money because you heat less water overall, which translates into lower energy bills.

If you aren’t sure whether you already have a low-flow device, you can always measure the gallons per minute (gpm) that a faucet or showerhead delivers. A lower gpm rating means the faucet uses less water.  The easiest way to do this is with a stopwatch and a gallon-sized jug (for a faucet) or bucket (for a showerhead).  Turn the faucet on all the way, then use the stopwatch to determine how many seconds it takes to fill up the gallon jug or bucket. Then divide 60 seconds by that time to get the gallons per minute the faucet produces. For example, if your showerhead filled up a gallon bucket in 18 seconds then it has a flow rate of 3.33 gpm (60 ÷18 gpm).

What’s the difference between regular and low-flow devices?

With a flow rate of 3.33 gpm, a 10-minute shower will use 33 gallons of water. If you pay 9 cents a gallon for delivered water, the shower cost $2.97. Now let’s say you have a low-flow showerhead, which is 2 gpm or lower. A 10-minute shower would use 20 gallons of water, and cost $1.80. While $1 in savings doesn’t seem like much, if you take 5 showers a week it adds up to $20/month or $240/year. And that’s not counting other occupants in the house.

What qualifies as low-flow?

Bathroom faucets must use a maximum of 1.5 gpm and showerheads 2 gpm to receive EPA’s label for low-flow appliances. The certification program, WaterSense, aims to help people use less water in order to preserve America’s water supply. Products must use at least 20% less water with no drop in performance compared to standard options. Look for products with WaterSense labels in stores.  As many of these products cost less than $100 and don’t take long to install, it can be an easy way to save energy in a single afternoon.

New standards for the Alaska Home Energy Rebate program

Those building an energy-efficient house in Alaska could qualify for a greater rebate from the state as of July 1. Homes that meet the highest energy standards can be rewarded with a $10,000 rebate, up from $7,500.

The New Home Energy Rebate Programwww.ahfc.us/efficiency/energy-programs/new-home-rebate is managed by the Alaska Housing Finance Corporation and provides incentives to build energy efficient new homes. An infusion of $300 million in state funding took place in 2008 and included money to fund rebate programs specific to both new and existing homes. Since 2008, the rebate programs have received more than $500 million in legislative funding.


Energy standards

The energy standards used in the program (called the Building Energy Efficiency Standards, or BEES) cover thermal performance, air leakage, moisture management strategies and ventilation. Typically builders and homeowners verify that they meet these standards by having an energy rating done from plans before construction begins, followed by a series of inspections during construction, and finally another energy rating upon completion, which also includes an air leakage test. Energy ratings and inspections are performed by a state certified energy rater: www.ahfc.us/pros/energy-programs/energy-rater.

As part of the initial energy rating done from plans, the home receives a certain score based on how energy efficient the building is. Using the rating as a guide, people can then make informed decisions in selecting measures which will reduce energy use, including (but not limited to) options such as adding more insulation to different parts of the structure, increasing air tightness, upgrading windows, or installing more efficient heating devices.

Previously, the highest rating possible was “5-star plus,” which came with a $7,500 rebate. Starting next month, there’s a new level called “6-star.” You must achieve a higher score (95 points or higher) but you also qualify for a bigger rebate — $10,000. The 5-star plus rebate continues to be in effect, however the rebate amount will now be $7,000.

The updated BEES standard also affects anyone applying for home financing through AHFC. To qualify for a mortgage, you need to reach at least 5-star (89 points). Before, you only had to meet 4-star plus (83 points).

These standards appear to be having a significant influence on new home performance. A recent analysis by the Cold Climate Housing Research Center found that about 60 percent of new homes built in Alaska between 2005 and 2009 (those that had an energy rating done) met the old BEES standard.

“It appears that BEES has become an industry standard here in Alaska,” said Dustin Madden, policy researcher at CCHRC. “This update means we should be seeing more energy efficient construction in the state, saving people money on fuel for years to come.”

What would a 6-star house look like in Fairbanks?

A 6-star energy rating can be achieved in a wide variety of ways. For example, a 1,900-square-foot home in Fairbanks could reach this bench mark with R-50 walls, an R-54 ceiling, R-20 rigid foam insulation on the exterior of a below grade floor, U-0.22 windows, a Heat Recovery Ventilator (HRV) and an 86 percent AFUE oil-fired boiler with an indirect fired hot water tank.

Every home will have issues specific to that structure which will affect the rating, including variables such as the exterior surface area to volume ratio, heating system type and efficiency, foundation type, and square footage of windows.

Consequently, getting on board with the rating process while still in the planning stages allows for maximum flexibility in making changes and adjustments to meet the 6-star (or 5-star plus) standard.

Vapor Barriers and House Wraps: where and why?

House wraps must stop bulk water from entering on the cold side and also be permeable enough to allow water vapor to pass through from the warm side.

House wraps must stop bulk water from entering on the cold side and also be permeable enough to allow water vapor to pass through from the warm side.

The building envelope is defined as those parts of a house that keep the indoor and outdoor environments separate. The building envelope includes the exterior walls, roof, windows, doors and the foundation and/or ground floor.

As elements of the building envelope, vapor barriers and house wraps are a critical part of controlling moisture and air flow through your home.

If selected and installed properly, these products can help you conserve energy, prevent mold growth and maintain the structural integrity of your home. On the flip side, not using these products or using one incorrectly can have the opposite effect.

Vapor barriers on the warm side

A vapor barrier, also known as a vapor retarder, is a layer of material designed to slow or nearly block the movement of water vapor by diffusion. How much a vapor retarder impedes the movement of water vapor is referred to as its permeability rating, or “perm” rating.  Six-mil-thick (0.006 inch) plastic sheeting is a typical vapor retarder material prescribed by residential building codes in cold climates, as its perm rating is extremely low.

In standard cold climate frame construction, the plastic vapor retarder is located on the warm-in-winter side of the wall — typically it is applied over the studs directly behind the drywall.

All homes contain moisture inside — cooking, bathing, breathing all create water vapor. In winter time the challenge then becomes keeping this water vapor from reaching places in the building envelope where it can condense.

Ventilation, which is essential to exchange moisture-laden air with clean, dry air, helps reduce the quantity of moisture in a tight home, but not enough to eliminate the need for a vapor retarder.

Where it gets interesting is that 98 percent of water vapor in a home travels by air leakage, while only the remainder moves by diffusion — through solid materials such as the drywall and sheathing in your walls. So, with proper sealing around penetrations and by sealing overlapping layers, we can also rely on the plastic vapor retarder to serve as an air barrier.

House wraps on the cold side

House wraps, on the other hand, are primarily designed to cope with the elements on the outside. They must be permeable enough to allow water vapor to pass through them from the warm side, but still stop bulk water like rain from entering on the cold side — similar to a Gore-Tex jacket.

By nature, house wraps must be vapor permeable enough to allow for drying if moisture finds its way into the wall cavity from either the inside or the outside. In addition, house wraps can help minimize the movement of air in and out of the exterior walls. Air movement through the building envelope in an uncontrolled manner, means you’re losing heat, which can become a burden on your budget.

To effectively repel water and reduce airflow, house wraps must be detailed correctly and applied using the manufacturer’s recommended methods and adhesives. All the penetrations into your walls from the exterior, such as vents, electrical connections, and architectural features, must be carefully accounted for.

The right types of house wraps can perform an important job in windy places by stemming significant heat loss and keeping the framing protected from precipitation that gets past the siding.

Final thoughts

The placement and permeability of vapor barriers and house wraps are addressed by building codes, but vary by region. Vapor barriers are required on the warm-in-winter side of the exterior walls in Fairbanks.

This article only touches on the details required to choose and install vapor barriers and house wraps. Placement and water vapor permeability can be a fairly complicated issue because of the wide variety of products on the market today.

You can find resources at CCHRC, the University of Alaska Fairbanks Cooperative Extension Service, and your local building department to help you make the right decisions. Doing your research up front will help maximize home performance and prevent problems later.

Full Scribe Log Home Building Workshop in Nenana

The log home made of freshly peeled white spruce sitting on the side of the road about two miles north of Nenana could be the first of many. At least, that’s what the Toghotthele Corporation is hoping.

“We’ve already had four people pull into the driveway and say, ‘Is this for sale?’ We have interest just from passers-by seeing the activity going on. If these guys are interested in it, we could sell them a kit,” said Jim Sackett, CEO of the Nenana-based corporation.

Earlier, a group of students placed the tie log for a roof truss. This included scribing the logs (or tracing the shape of one log onto the other), cutting the notches, and using an excavator to lift and position the tie log on top of the side walls.

The 16-by-20-foot full scribe log home is the product of a three-week construction workshop that wrapped up earlier this month offered by Toghotthele and the University of Alaska Fairbanks Cooperative Extensive Service. It was taught by Robert Chambers, who teaches log building around the world, and local log builder Rich Musick.

The students are Toghotthele shareholders, plus a contractor from California who flew up specifically to take the class. They’re learning the craft not only to build log homes of their own, but also to possibly start a new business in Nenana that uses local resources and provides new housing.

Sackett is anticipating a potential housing boom if oil is found during exploratory drilling in the Nenana Basin this summer. Toghotthele owns roughly 140,000 acres of white spruce and is developing two subdivisions for construction.

“If people start moving into the area to take oil-related jobs, we don’t have much of a housing surplus in Nenana. Log homes are a natural fit to Alaska in general and specifically to Nenana. About half the homes in Nenana are log already.”

Full scribe construction means the logs retain their natural shapes and irregular surfaces. They are precisely hand-fitted to each other with no gaps, nails or other hardware. The method Chambers is teaching allows for logs to shrink as they dry (which typically takes up to six years) to ultimately form an airtight joint.

During the course, students practiced techniques familiar to log construction including scribing, notching, using chain saws and hand tools for sculpting and fitting, and other tools like spuds (for removing bark) and plumb bobs and levels (to orient layout lines and logs in horizontal and vertical directions relative to one another).

In today’s trend toward super-insulated homes, there is debate about how much insulation is enough. When it comes to logs, the R-value of wood is lower than other insulating materials. Wood is about R-1 per inch, compared to fiberglass (R-3.2 per inch) or rigid foam (R-4-5 per inch). So in theory, it would take a 16-inch log to achieve the same R-value as a standard 2×6 wall filled with fiberglass (if you don’t count extra heat loss through the studs).

“By the numbers, you’d be really hard-pressed to find Interior Alaska logs big enough to perform above R-21. But it’s a matter of perspective. You can build a decent wall system, and by making improvements to the rest of the shell — putting in an efficient heating system, good windows, good foundation and roof insulation — you can do really well,” said Ilya Benesch, building educator at the Cold Climate Housing Research Center.

As Chambers puts it, the embodied energy of building with local logs (the total energy used to produce all the building materials) beats most other construction methods.
“Homes that have a lot of concrete, aluminum and glued manufactured wooden products have a very high embodied energy,” he said.

In addition, well-built log homes can last 1,000 years, making them even more sustainable, he said.

You also can build very tight homes using full-scribe construction. Chambers seals the space between logs with a double gasket made from open-cell foam that is compressible but acts as an air and vapor barrier.

He noted a log home in Soldotna that tested at 0.5 air changes per hour, which rivals some of the tightest homes out there.

Chinking with elastic caulking is another way to air-seal joints between logs, though alters the appearance of the otherwise natural fit.

As Sackett points out, some Alaskans just prefer log.

“Log is just natural to Alaska. A lot of the early homes were log, and people just have this attraction to log homes,” he said.

“It’s a resource Toghotthele already owns, so figure out what you can do with what you already have.”


Check out Chambers’ DVD and book series here.

Placing the cross tie log onto the end wall

Placing the cross tie log onto the end wall

Green logs take 4-6 years to settle and form an air-tight seal.

Green logs take 4-6 years to settle and form an air-tight seal.

Placing the cap log on the cabin.

Placing the cap log on the cabin.

Scribing, which means tracing the shape of one log onto the other for a perfect fit.

Scribing, which means tracing the shape of one log onto the other for a perfect fit.

The class

The class

Shallow Frost Protected Foundations: a good option for the right site

Photo Courtesy Wisdom & Associates. The frost protected shallow foundation uses insulation to create a heat bubble under the structure. The heat bubble keeps the ground underneath and around the structure from freezing, effectively raising the frost depth. The shallower frost depth allows for a shallower footer.

Photo Courtesy Wisdom & Associates. The frost protected shallow foundation uses insulation to create a heat bubble under the structure. The heat bubble keeps the ground underneath and around the structure from freezing, effectively raising the frost depth. The shallower frost depth allows for a shallower footer.

When building homes in cold climates, traditionally the foundation is placed on undisturbed (or compacted) soils and below the frost line to better resist the potentially destructive effects of ground freezing and frost heaving. In Alaska, every region has building codes and/or generally accepted design standards that specify the depth of the local frostline. In Fairbanks, the design depth for footings is a minimum of 42 inches below grade. Installing footings and a foundation wall at this depth can be expensive, and in some cases a shallow frost protected foundation (SFPF) might present a more economical option. As a general rule, a SFPF system is feasible only on ground free of permafrost.

Unlike a standard foundation, a shallow frost protected foundation can be placed well above the frost line — often at depths of about 16 inches below grade, and in some cases less. Since the foundation now rests on soils that normally would freeze seasonally, the key issue is to keep the ground underneath and on the sides of the foundation from freezing. SFPF designs usually depend on foam board insulation laid out far enough horizontally around the perimeter of the footing to ensure that the ground underneath remains thawed year round, no matter how cold it gets.  In essence, the horizontal insulation creates a “heat bubble” in the ground under the building.  A frost protected foundation can accommodate a variety of designs including thickened edge/monolithic slabs and shallow footings.

By code, the horizontal foam board insulation must be protected from sunlight and physical damage. Typically, this means the insulation will get covered with a layer of backfill thick enough to protect it for the life of the structure — although concrete or pavement coverings also might be options (in a high traffic area, for example). Typically, foundations including SFPF systems should extend a minimum of 6 inches above grade to keep wood framing away from ground moisture. Any vertical area above the horizontal insulation also must be well insulated.

In Interior Alaska, SFPF systems are fairly new and a professionally engineered design will buy a lot of peace of mind. Because of site-specific variations in soils conditions and foundation designs, a professional engineer will best be able to calculate the insulation values and installation methods to ensure the foundation will perform properly.

This model is included just to show how heat leaks from the foundation into the ground. “Warm” colors indicate temperatures above freezing. “Cool” colors indicate soil temperatures below freezing. The dashed blue line is the freezing front, which you do not want to contact the foundation.
 

How can I use thermal storage in my home?

 A 5,000 gallon tank acts as thermal storage in a home heated by a solar thermal system. Photo Courtesy Reina LLC.

A 5,000 gallon tank acts as thermal storage in a home heated by a solar thermal system. Photo Courtesy Reina LLC.

CCHRC recently completed a study on how you can use thermal storage as part of your home heating system.

Thermal storage has recently gained interest in Alaska as it has the potential to increase the efficiency of heating appliances, enhance the use of renewable energy in cold climates, and reduce emissions of certain appliances like wood boilers. It is most suited for renewable energy systems such as solar thermal, geothermal and biomass, but can be adapted to a wide variety of heat sources. The report looks at different design considerations and describes several examples in homes around Alaska.

Thermal storage is a common concept. Many households use water storage tanks to provide domestic hot water, which can range from just a couple gallons to more than 100 gallons. Thermal storage also can be used in space heating systems to store heat for a certain period of time. For example, storing the heat from solar collectors in a buffer tank to use at night; storing heat from a wood boiler in a water tank to allow for a hotter, more efficient burn; or storing heat in the ground to harvest later with a ground source heat pump. In each case, thermal storage can be thought of as a “heat battery” because it holds energy to be used later. In this way, it can enable a heat source with intermittent delivery (like the sun or wind) to still meet demand.

Every thermal storage system needs three basic components: a heat source, a storage medium to store the heat (such as a tank of water, rocks or soil), and a discharge method (heat exchanger) to distribute the heat. Technically, any heat source can be used to charge a thermal storage material, however you should select the fuel and storage material based on availability, cost and compatibility with your home’s needs.

Also, many factors will drive the design of a thermal storage system for your home — such as your heating appliance, your distribution system, your heating demand, your lifestyle and many others. The design of the system also will depend on whether the system is being installed in a new home or being retrofitted into an existing one, as retrofits must accommodate the existing distribution system and available space in the home.

There are various applications of thermal storage throughout Alaska. A net-zero heating home built in Fairbanks several years ago uses solar thermal collectors and a masonry heater to charge a 5,000-gallon insulated water tank that provides heat to a radiant floor system.

The tank also heats domestic hot water in the house.

A different system, located at CCHRC, uses a wood-fired boiler to charge an insulated 1,500-gallon tank of water in the lab. The goal was to fire the boiler hot and fast, which produces more Btu and fewer emissions, and save the heat to use when it’s needed, rather than damping down the boiler so the fire lasts longer.

The water tank heats 1,900 square feet of lab space in the building. The tank was sized to hold as many Btu as the boiler could produce in one firing per day and to provide enough heat for the entire lab over a full winter day.

If you’re considering a thermal storage system, the first step is to consider what your goal is. Do you want to use renewable energy instead of fossil fuels? Are you looking for short-term (a few hours or overnight) or seasonal storage? Systems that are recharged daily are smaller and less expensive than seasonal systems.

Check out the report for an overview of various types of systems used in cold climates, case studies in Alaska, and tips for designing your own system.

Report: www.cchrc.org/docs/reports/thermal_storage.pdf

What should I be aware of when building on permafrost?

If pilings are used on permafrost, they must be installed to a depth that will both support the structure and resist frost jacking due to seasonal ground movement.

Permafrost is loosely defined as soil and/or rock that remains frozen for more than two years. In the Fairbanks area, permafrost tends to be discontinuous and is concentrated primarily on north-sloping hills and in lower elevations with heavy ground cover. Big trees do not guarantee the absence of permafrost; it might just mean that permanently frozen ground or ice is down far enough that the soils in that spot can support a larger root system. The only way to be certain of what the ground contains is to have a soils test drilling done.

With permafrost, the safest bet is to it avoid it altogether and move to another piece of land. This is easier said than done, particularly because of the scarcity of buildable land near Fairbanks that is affordable. If you decide to build on permafrost, be as strategic as possible. Smaller and simpler structures will tend to fare better than larger, more complicated ones.

Minimal site disturbance is the accepted practice. The trees and the ground cover are your best friend. They protect and insulate the ground from the heat of the summer. A great example is the green moss you find on many of the shaded low-level areas in Fairbanks. Moss has a high insulating value, and in many cases if you dig down a couple of feet, the ground might still be frozen in the middle of summer.

Strategies for construction on permafrost include:

• As a general rule, the organic layer of ground cover provides insulation and should not be removed, as this will increase the risk of thawing any frozen ground underneath.

• Elevate and properly insulate the bottom of your house to prevent heat losses through the floor system from reaching the ground underneath, which can lead to thawing.

• In post and pad construction, use a thick gravel pad that is significantly wider than the house itself (also insulated if possible) to stabilize the ground and spread building loads.

• If wood or steel piles or helical piers are used, they must be installed to a depth that will both support the structure and resist frost jacking from seasonal ground movement.

• Cut trees sparingly to maximize site shading (while permitting for a fire break).

• Build a wrap-around porch, which will help shade the ground around and underneath the house.

• Incorporate large roof overhangs to shed water away from the house and provide shade.

• Install gutters and manage site drainage well away from the house.

• Retain an engineer familiar with local soils conditions to assist in designing a foundation system that will adequately and safely support your home on the soils specific to your site.

• Septic systems also must be engineered to function on permafrost, and remember that conventional systems might risk thawing the ground.


Other Resources 


Permafrost Technology Foundation case studies: http://www.cchrc.org/permafrost-technology-foundation-library

U.S. Permafrost Association website: www.uspermafrost.org/education/PEEP/ptf-manuals.shtml

UAF Cooperative Extension Service online publications at www.uaf.edu/ces.