Tag Archives: building

Hot roofs, cold roofs, and common roof problems

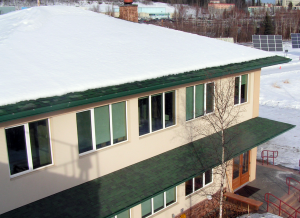
Cold roof on the CCHRC building.

In severe cold climates, roofs face two important challenges; retaining heat effectively, and controlling moisture trying to escape from the living space.  The colder the weather and the longer the winter, the more pronounced the issues can become.  Deficiencies and poor building practices that are overlooked in a more forgiving climate become very apparent here in Fairbanks.   A basic understanding of your roof system and the challenges it faces can help to identify the sources of problems.


Roofs fall into two categories: “cold” and “hot.”  They can suffer from the same ailments.


A properly constructed “cold” roof maintains a continuous air space between the underside of the roof and the insulation. This air space is designed to do two things.  To some degree, it allows an exit path, through vents, for moist air that has leaked from holes in the ceiling vapor barrier into the insulation cavity. The space also creates a thermal break that helps prevent escaping interior heat from conducting directly to the roof’s underside, where it can cause the snow above to melt.


A “hot” or unvented roof relies on high levels of insulation to slow down heat transfer to the exterior.  The other critical component in a hot roof system is a near-perfect vapor barrier that keeps moisture-laden air from entering the roof cavity, where it can become trapped.

If either type of roof fails to retain heat, one result is ice damming, a fairly common sight in Fairbanks in mid-winter. The classic symptoms are large icicles hanging off of eaves and exposed spots on the roof where snow has melted away. Roof problems are more pronounced in our climate because we have an increased “stack effect.” Rising warm inside air will try to exit the building through leaks at the ceiling level. To replace it, dense, cold, outside air is drawn through cracks in the bottom of the house like a chimney. The greater the temperature difference between inside and outside, the stronger the stack effect, amplifying the heat loss.

Water vapor abides by similar laws. During winter there is a huge imbalance between moist, heated indoor air and extremely dry, cold outdoor air. Because water vapor molecules by nature try to reach equilibrium, they will move through any vulnerable areas (including solid wood) to balance the moisture levels. This is called vapor drive. The greater the temperature difference, the more intense the vapor drive. When a house has high indoor humidity, the combination of stack effect and vapor drive can cause severe moisture problems inside the roof if it is poorly sealed.   Gone unnoticed, this can lead to structural damage as well as mold and its accompanying health issues.

Whether your roof is hot or cold, three elements will keep problems at bay: good indoor moisture control, adequate insulation, and good sealing.
How do tankless hot water systems work and are they really more efficient?

Tankless hot water systems, also known as on-demand heaters, only produce hot water when you call for it—by turning on the sink, shower, or other appliance. They heat water instantly as it runs through a pipe and deliver it to your point of use, so you don’t have to store hot water in a tank and heat it all day. These on-demand heaters can be powered with propane, natural gas, or electricity.

You can save energy with this kind of system because you’re not paying to heat water when it’s not being used and you eliminate stand-by heat losses. Another benefit is that you never run out of hot water, unlike a tank system.

But a tankless system is prone to control and pressure issues. One problem is that on-demand heaters can produce bursts of cold water. For instance, if you finish taking a hot shower and turn off the water, the heater will shut off but the water in the pipes will remain warm (because they’re insulated). Yet the water inside the heater will cool off. So the next bather thinks the water is hot, jumps in, and soon gets a blast of cold water making its way through the pipes.

Another limitation of tankless heaters is that they can only heat a certain amount of water per minute. So if the washing machine is turned on during a shower, the hot water is split between the two uses, reducing water pressure all around. The good news? Both of these problems can be solved by adding a couple accessories to your system.

You can prevent cold bursts of water by adding a small, 2- to 10-gallon electric water heater (like a mini water tank) in between the tankless water heater and the point of use. This creates a buffer between sections of chilly water and your showerhead. The heater and installation will cost about $450.

The pressure issue can be fixed by adding a large pump to the system that can push enough water through the heater to accommodate multiple hot-water users at once. Adding the pump will cost about $650.

These add-ons drive up the price of a tankless system from around $300 (for the low end) to more than $1,000. Meanwhile, a hot water tank costs between $200 and $900. If you can live with idiosyncrasies like variable temperature and pressure, and don’t want the add-ons, then the tankless system will pay off in just a few years (thanks to energy savings). If you desire a system that is free of idiosyncrasies, the payback period will be much longer.

Emergency Housing at Crooked Creek

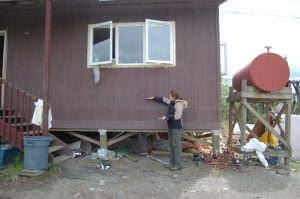
CCHRC staff examine flooding damage at Crooked Creek homes

CCHRC is working on a housing project in the village of Crooked Creek that symbolizes a new way of responding to disasters in rural Alaska. The Kuskokwim River flooded the village in May, damaging or destroying half the homes in the town. The Alaska Division of Homeland Security and Emergency Management asked us to quickly design nine new energy efficient homes that could be built before winter.


We’ve created a design that is simple—it can be built by the many volunteers involved—flexible—it can be applied to homes with different sizes and floor plans—and tight—it can be heated with far less fuel than existing homes. The entire structure-walls, floors, and roof-will consist of a single system of 2x4s, so the homes will be quick and easy to build. This project is a milestone for rural housing because it adds an energy efficiency focus to the emergency-response building process. It recognizes that even replacement housing needs to be efficient, climate-specific, and durable.

We’re adapting techniques from prototype houses that we’ve tested in other villages, like Anaktuvuk Pass and Quinhagak, such as spraying foam insulation against metal siding to create a complete thermal envelope. The building sites will be elevated above the floodplain on gravel pads.

This is part of a larger plan with the Alaska DHS&EM to create regionalized, grab-and-go models that can respond to different disasters all over the state.

Our project partners include the Alaska DHS&EM, the Village of Crooked Creek, the regional corporation Calista, AVCP Regional Housing Authority, and Samaritan’s Purse.

What do I need to be aware of when building on permafrost?

Permafrost is loosely defined as soil and/or rock that remain frozen for more than 2 years.  In the Fairbanks area, permafrost tends to be discontinuous and is primarily concentrated on north-sloping hills, and in lower elevations with heavy ground cover.  Big trees do not guarantee the absence of permafrost, it may also mean that permanently frozen ground or ice is down far enough that the soils in that spot will support a larger root system.  The only way to be certain of what the ground contains is to have a soils test drilling done.

With permafrost, the safest bet is to it avoid it altogether and move on to another piece of land. This is easier said than done, particularly due to the scarcity of buildable land near Fairbanks that can be affordably purchased. If you decide to build on permafrost, do so as strategically as possible. Smaller and simpler structures will tend to fare better than larger more complicated ones.

Minimal site disturbance is the accepted practice.  The trees and the groundcover are your best friend.  They protect and insulate the ground from the heat of the summer.  A great example is the green moss that you find on many of the shaded low-level areas in Fairbanks.  Moss has a high insulating value, and in many cases if, you can dig down a couple of feet the ground may still be frozen in the middle of summer.

Strategies for construction involving permafrost include:

  • Elevating and properly insulating the bottom of your house and all pipes to prevent your house’s heat from reaching the ground with an adjustable post-on-pad system;
  • Using thick gravel pads (also insulated if possible) in order to stabilize the ground and spread building loads;
  • Build using wood or steel piles, or helical piers that anchor in permafrost is an effective, but generally more expensive means of supporting a foundation;
  • Installing thermosyphons to draw heat away from the soil – generally expensive;
  • Avoiding cutting ground-covering vegetation, especially the moss and root layer, that helps to shield the ground from the sun’s heat;
  • Cutting trees sparingly (while permitting for a fire break);
  • Building a wrap-around porch, which will help shade the ground around a house;
  • Incorporate large roof overhangs to shed water away from the house and provide shade.
  • Installing gutters and manage drainage well away from the house;
  • Retain an engineer familiar with local soils conditions

Additional information can be found on the US Permafrost Association website: http://www.uspermafrost.org/education/PEEP/ptf-manuals.shtml the CCHRC library, and UAF’s Cooperative Extension Service (CES) online publications at http://www.uaf.edu/ces.