Tag Archives: construction

What are Vacuum Insulated Panels?

Vacuum insulated panels, or VIPs, are a relatively new product making their way into buildings in the United States.

They can be used as stud cavity insulation or as continuous exterior insulation on structures, just like other types of insulation.

As the name describes, VIPs consist of a panel with the air inside of it removed to form a vacuum. It isn’t a perfect vacuum, but the air pressure inside the VIP is considerably less than ambient pressure. The panels are airtight and resistant to water vapor absorption. They make good insulators because the lack of air almost completely eliminates conductive and convective heat transfer through the center of the panels. Typical panels are fairly small, 1 x 2 feet or 2 x 4 feet, and about 1 inch thick.

VIPs have an R-value of approximately R-25 per inch at the center of the panel and about R-20 for the whole panel (exact R-value depends on the manufacturing process and materials). The center of the panel will have a higher R-value than the edges, much like a window, as edges provide a thermal bridge for conductive heat transfer and lower the R-value of the entire panel. Even the whole-panel R-value is considerably higher than other insulations: fiberglass batts are around R-3.8 per inch, EPS is around R-4 per inch, and XPS is around R-5 per inch.

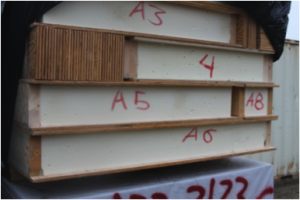
VIPs are installed on the sheathing plane of a building using adhesive. The material surrounding the VIPs in a wall is very important, because it helps protect the VIP from damage during installation. However, because the VIP is not continuous, the lower R-value surrounding insulation will bring the total wall R-value down. This is similar to what happens in a traditional stud-framed wall with fiberglass batts in the cavities — the wooden studs provide a thermal bridge for heat to escape and reduce the total wall R-value. With VIPs, even if the “studs” were made of EPS insulation, the whole wall R-value will still drop more than the fiberglass wall drops with the addition of wooden studs. It is important to consider how to provide structure for VIPs without providing too much thermal bridging.

As with any new building product, there are potential disadvantages of using VIPs that must be considered. First, VIPs must be manufactured in a factory and then shipped to the building site.

They can’t be cut or modified in the field. This means that detailed plans must be completed prior to construction and there is no flexibility in modifying them, unlike a traditional stick-framed wall.

VIPs also cost quite a bit more than other types of insulation. In addition to the more intensive manufacturing process, the panels have to be shipped to the building location.

There are currently only a few manufacturers in the United States, so this could be quite a long distance.

Finally, panels will naturally lose some vacuum over time. When they do, the R-value drops substantially. Manufacturers currently estimate the lifespan of the vacuum at 25 to 50 years. The seals must be treated carefully during the shipping and installation process to protect the vacuum. And putting a nail through a VIP damages the R-value of the panel much more than with other types of insulation. Losing the panel vacuum due to a hole in the panel reduces the panel’s R-value by more than half, often bringing it down to around R-6 per inch.

VIPs in Alaska

VIPs have a number of applications throughout the world, including refrigeration equipment, vending machines, shipping containers and construction. A few companies are manufacturing them in the United States, including Nanopore and Dow Corning. The new engineering building at the University of Alaska Fairbanks will use Dow Corning VIPs in a test wall system, which consist of fumed silica (basically glass powder) wrapped in a layer of plastic and aluminum. In effect, the plan is to replace some EPS foam in the wall system with a small vacuum panel. UAF researchers are planning to measure the installed R-value of the panel to study its appropriateness for buildings in our climate.
What is Timber Frame Construction

Photo Courtesy Dave Miller

Photo Courtesy Dave Miller

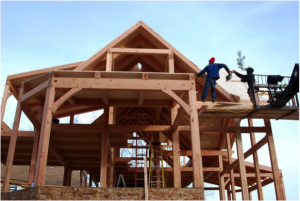
Timber frame homes are characterized by large structural wooden beams visible throughout the interior. Timber-frame construction techniques have been in use for hundreds of years throughout the world, initially brought to North America by European settlers.

The skilled craft of timber framing remained common practice until the early 19th century, at which point both milling and construction methods shifted to machines and mass production. Advances in technology, such as large powered circular saws, enabled mills to quickly produce large quantities of smaller dimensional lumber, which could be more easily transported. In turn, mass produced smaller framing members made it possible to erect a home with only a small team of builders using “stick frame” construction techniques that remain relatively unchanged to this day.

While timber frame construction is still in use, it has evolved from the purely practical construction technique that it once was. Originally, timber framing was primarily structural, however in today’s homes, timber frame construction is also used to showcase the aesthetics of the timber frame substructure, since it remains exposed towards the home’s interior.

Many different tree species can be used for a timber frame, including Douglas fir, Sitka spruce, Eastern white pine, red cedar, oak and Interior Alaska white spruce. The trees are handcrafted or milled into large beams.

In the United States, there are several suppliers who cut custom beams according to a computer-aided design plan sent to them by a builder.

At the building site, the beams are assembled into a structural frame that is fastened together with a combination of carefully fitted interlocking wood joints and wooden pegs and splines. In a traditional timber frame, metal connectors of any kind are seldom used. A completed frame will contain combinations of dozens of types of joinery that make it unique.

For instance, some substructures are built like wooden furniture, where the connecting beams use mortise and tenon joinery, a process through which two beams are cut so that one has a square or rectangle opening (the mortise) into which the other beam (the tenon) fits exactly.

Usually, joints of this type are held together with exposed wedges or pegs and have the additional benefit of great strength. (A similar construction technique, post-and-beam, uses metal braces and bolts to connect beams.)

After the timber frame substructure is erected, it is enclosed, often using structurally insulated panels (SIPS), to complete the home’s envelope. Most timber frames homes have open interior designs to showcase their exposed architecture. Plus, interior walls are not needed for structural purposes.

Timber frame homes come in all sizes, from small cabins to expansive homes. While timber frame construction tends to cost more than traditional stick-frame construction, the extra planning, materials, and labor results in a truly unique and durable home.

Today, timber frame construction fills both a practical and artistic role in the building community by crafting a home that is both a shelter and a work of art.

What are Structural Insulated Panels and considerations for Alaska

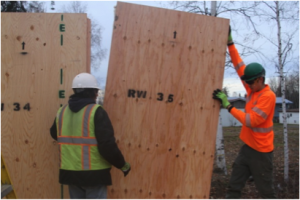
SIPsStructural Insulated Panels, or SIPs, are prefabricated building panels that combine structural elements, insulation, and sheathing in one product. SIPs can be used for the walls, roof and floor of a building in place of more traditional construction methods, such as stick-framing. A SIP typically consists of a foam insulation core with a structural sheathing panel bonded to both faces. Sheathing panels are usually made of industry standard OSB or plywood.

Building with SIPs


Constructing a home from SIPs begins at the design phase: builders must work with the SIP manufacturer since the panels are specific to the design. Once the plans are finalized, the SIPs are made and shipped to the job site. The panels are labeled so builders know exactly where each panel goes in the building.

As they are erected, the panels must be joined together according to manufacturer specifications. For instance, many panels are joined with splines that are secured with screws. When the structural connections between panels are being made, workers must take care to seal the joint between the panels to ensure it remains airtight. Air sealing the panel joints can be accomplished using sealing agents such as caulk, adhesive, mastic, spray foam or tape. A tight seal is also necessary in order to prevent moisture from entering the panel, which can lead to structural deterioration of the panel components over time. Some building inspectors may require a 6mil polyethylene sheeting vapor retarder be installed on the interior side (warm side) of the SIPs once the panel construction is completed.

SIPs2

Electrical outlets and wiring are usually installed into recesses and holes pre-cut into the panels, both on the interior and the exterior as needed. Any special considerations for running electrical systems or other mechanical penetrations through the SIPs should be addressed with the manufacturer during the design phase.

Benefits and Concerns

There are several potential benefits to building with SIPs. For one, the absence of an air permeable wall cavity prevents convective heat losses from occurring within the panels. Large panels will have fewer framing members than a stick-framed wall, which reduces heat losses due to thermal bridging. With a trained crew, SIP buildings can be erected quickly, a big advantage in climates with short building seasons. Properly constructed, a SIP panel home can realize a high level of air tightness and energy efficiency.

On the other hand, builders must take extra care to ensure proper assembly and sealing to prevent any problems due to moisture infiltration and air leakage. Builders also do not have much flexibility in on-site design changes, since panels come pre-cut. An experienced builder who can work through a home design with the manufacturer and who doesn’t cut corners with sealing panel joints is a necessity.

SIPs can be either cost-effective or cost-prohibitive depending on the situation. The design services and shipping costs may drive the price of SIPs above that of conventional framing materials. However, this can pay off in reduced labor costs if a trained crew erects a building quickly, or if several buildings of the same design are being erected.

Should you insulate your basement or crawl space?

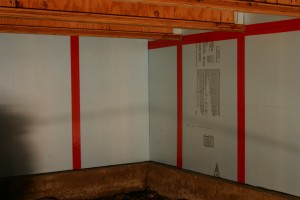
The foam board in this basement is in the process of being air sealed with tape at the joints and corners.

Concrete basements in many older homes are inadequately insulated by today’s standards (or not insulated at all). For new construction, both state and local building codes require a minimum R-value of 15 for below-grade walls (walls buried in soil).

This makes good sense as the soils in our region are relatively cold; even below the frost line, soil temperature may only reach a high of 36°F.

This means that in a poorly insulated basement, significant heat losses can occur year round. Basement walls that are well sealed and insulated, on the other hand, can save money and make yourhome more comfortable.

In older homes, it is often more practical to insulate the basement from the inside. If there are any problems with water penetration, make sure you fix them first or any work you do on the inside will be compromised.

If gutters and good site drainage don’t solve a water problem, then unfortunately excavating the exterior and applying a coat of waterproofing and resolving drainage issues may be necessary.

Rigid foam board or high-density spray-applied foam insulation make good choices for basement walls. Both products are resistant to air flow and can tolerate occasional exposure to small amounts of moisture. Depending on the type of foam, it will take between 3 and 4 inches to produce the minimum R-value of 15. Remember that the concrete behind the insulation is cold and will attract condensation if it is exposed to inside air.

If you use rigid foam board, then the joints should be tight, taped and also staggered if you are using several layers.

Be aware that building codes are strict regarding exposed foam in living spaces, and almost all foam insulations will have to be protected with some type of fire-proofing.

Once the foam is in place, then wood framing or furring can be used to run wiring and plumbing, and to provide an attachment for Sheetrock (which is a fire protection). Often, using a plastic vapor retarder is not advised if you will be insulating the basement walls with foam board. If properly sealed, the foam provides a good air barrier, and a layer of plastic sheeting will only reduce the wall’s ability to dry out, should moisture ever make its way in.

Basement walls that are well sealed and insulated can result in big energy savings and increased comfort. But because this area of your home will become much tighter, you may need to consider some form of mechanical ventilation to insure good air quality and humidity control.

Reflective Insulation-not a big help in cold climate construction

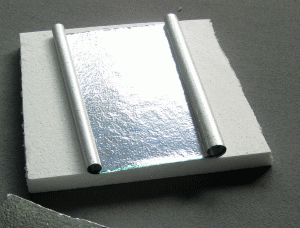
adding an aluminum facer to a 1-inch piece of EPS (expanded polystyrene)

CCHRC has just released a report on the effectiveness of reflective insulation in a cold climate. The insulation, which has a reflective surface, is commonly used in hot climates to reflect heat from the sun away from a building. For example, a home in Florida could add it to the roof decking to divert heat from the attic insulation and save on air conditioning.

But our researchers found that the insulation is less effective in a cold climate because it doesn’t add much r-value to an already well-insulated building.

Check out the full report here