Tag Archives: cold climate housing research center
Sustainable Village: Laying Foundations
CCHRC is demonstrating an innovative foundation design at the Sustainable Village. Two of the homes, sitting on permafrost about 9 feet deep, will be built on steel piles, a common method for building on frozen ground. The other two, situated on stabler soil, will have an insulated mat foundation.
Builders laid the mat foundations last week. They include a geotextile mat placed directly on the soil with several feet of gravel on top. PVC pipes are embedded in the gravel in a grid formation as a backup cooling system. Resting on the pad is a steel floor assembly. Spray foam was applied against the entire system for a monolithic layer of insulation at least 10 inches thick. This is designed to prevent heat from inside from transferring to the ground. Temperature sensors were strung about 10 feet down into the soil to monitor any changes. If needed, cold air could be circulated through the piping system in the winter to lower the temperature, as insurance against shifting ground.
Here’s a look at the pad preparation.
Bethel school harnesses resources to save money
CCHRC is working with an education center in Bethel to help improve the energy performance of its new building.
Yuut Elitnaurviat is a vocational center that offers training in construction, health care, dental health aid, and other subjects for residents of the Yukon-Kuskokwim Delta region.
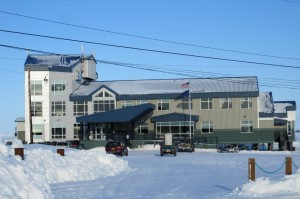
The new building at Yuut Elitnaurviat campus consumes more than 40 percent more than the average building in Alaska.
The school is spending more than 40 percent more than the average commercial building in Alaska for heating and power at its facilities—which includes a classroom, admin offices, a cafeteria, dormitory and shop—and the building is only a few years old. This stems from inefficiencies in heating, lighting, and ventilation systems, among others. For example, the air handling system is consuming more than its fair share of energy use and may be oversized for the building. In addition, the school is paying to heat much more domestic hot water than it actually needs.
CCHRC researchers visited the campus in March to explore options for improving the building’s performance.
“They’re paying almost 50 cents a kWh, and they’re using around 32,000 kWh a month, so it makes more economic sense to focus on the electric load than on space heating at this point,” said CCHRC research engineer Bruno Grunau.
CCHRC prepared a feasibility study of the local resources and found both wind and solar photovoltaic systems would be viable technologies. Researchers are now helping school officials plan a small wind farm and solar array. The wind farm could include up to 4-5 turbines, each producing approximately 6,000-10,000 kWh per year, and a 10 kW PV array that would produce approximately 8,500 kWh a year.
Building officials are also pursuing a commercial energy audit to find other economical ways to save energy, such as tightening the building envelope or installing high-efficiency lighting and daylight sensing.
The UAF Sustainable Village: drilling, design, and detailing
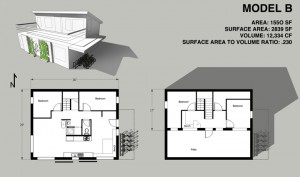
The University of Alaska Fairbanks (UAF) and the Cold Climate Housing Research Center are gearing up to break ground on the UAF Sustainable Village, a super-efficient campus housing project planned for this summer. CCHRC designers have developed the building form and floorplan as well as the envelope and foundation design.
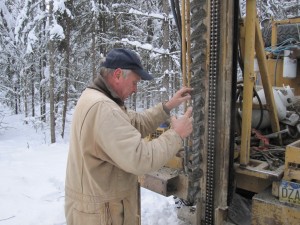
Site clearing of four lots took place in November, and UAF scientists drilled two 30-foot boreholes for a soils analysis in February. The west site revealed strong, stable soils, with silt and gravelly sand, while the east site revealed marginal soils with six feet of silt and peat on top, then three feet of ice-rich silt, and below that fine sand and gravelly sand. “The east site will be the best place to test some innovative foundations,” said CCHRC designer Aaron Cooke.
Now the team is focused on structural engineering, construction detailing, and planning mechanical, electrical, plumbing, and other systems.
Meanwhile, students are involved in the project at many levels—creating cost analyses for renewable energy systems, helping CCHRC with the foundation design, and setting up a social study of the Village.
How to build and maintain efficient, healthy walls
Are you curious about what’s in your walls, but not quite ready to tear them apart to find out? We’ve dissected a standard wall system to see what’s inside, and what it tells us about your home energy performance and the durability of your envelope.
Whether you’re building a new home or retrofitting an existing one, this video will show you the key to tight, long-lasting walls. It will give you an understanding of the three main issues facing walls in a cold climate: air leakage, moisture movement, and conductive heat loss. CCHRC building educator Ilya Benesch will show you how these effects are at play in yours walls, how to spot them, and how to deal with them. Enjoy!
Should you insulate your basement or crawl space?
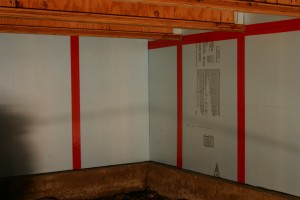
The foam board in this basement is in the process of being air sealed with tape at the joints and corners.
Concrete basements in many older homes are inadequately insulated by today’s standards (or not insulated at all). For new construction, both state and local building codes require a minimum R-value of 15 for below-grade walls (walls buried in soil).
This makes good sense as the soils in our region are relatively cold; even below the frost line, soil temperature may only reach a high of 36°F.
This means that in a poorly insulated basement, significant heat losses can occur year round. Basement walls that are well sealed and insulated, on the other hand, can save money and make yourhome more comfortable.
In older homes, it is often more practical to insulate the basement from the inside. If there are any problems with water penetration, make sure you fix them first or any work you do on the inside will be compromised.
If gutters and good site drainage don’t solve a water problem, then unfortunately excavating the exterior and applying a coat of waterproofing and resolving drainage issues may be necessary.
Rigid foam board or high-density spray-applied foam insulation make good choices for basement walls. Both products are resistant to air flow and can tolerate occasional exposure to small amounts of moisture. Depending on the type of foam, it will take between 3 and 4 inches to produce the minimum R-value of 15. Remember that the concrete behind the insulation is cold and will attract condensation if it is exposed to inside air.
If you use rigid foam board, then the joints should be tight, taped and also staggered if you are using several layers.
Be aware that building codes are strict regarding exposed foam in living spaces, and almost all foam insulations will have to be protected with some type of fire-proofing.
Once the foam is in place, then wood framing or furring can be used to run wiring and plumbing, and to provide an attachment for Sheetrock (which is a fire protection). Often, using a plastic vapor retarder is not advised if you will be insulating the basement walls with foam board. If properly sealed, the foam provides a good air barrier, and a layer of plastic sheeting will only reduce the wall’s ability to dry out, should moisture ever make its way in.
Basement walls that are well sealed and insulated can result in big energy savings and increased comfort. But because this area of your home will become much tighter, you may need to consider some form of mechanical ventilation to insure good air quality and humidity control.
What is a combined/integrated heating system?
 Many homeowners use the same appliance to heat both their house and their domestic hot water. These multipurpose appliances are called combined or integrated systems.
Hot water for space heating goes into a hydronic distribution system or to coils for forced air distribution, while domestic hot water goes to a storage tank or directly to the faucet. Combined systems work with several types of appliances, including boilers, ground source heat pumps or solar thermal systems.
Combined systems offer several advantages over distinct systems. Since an integrated system provides both domestic hot water and space heating, you have fewer appliances to maintain. During the heating season, it’s more efficient to have a single appliance providing both hot water and heating because you have fewer on-off cycles. It also saves space.
On the downside, combined systems can be less efficient when the heating appliance only fires occasionally—in summertime, for example. In addition, it’s tough to measure the efficiency of combined systems because the rating on the appliance (known as the AFUE) only applies to space heating, not domestic hot water. A heating contractor or someone who owns the same appliance can give you a better idea of the actual efficiency.
There are two types of combined systems—storage tank and tankless. Storage tank systems are most popular. In this setup, the appliance simply sees the hot water tank as an additional zone, but one that is separated from the space heating system to avoid contamination of the drinking water. When the domestic hot water tank calls for heat, the appliance sends heat to that zone. Having a storage tank forces the appliance to fire only a few times a day to provide hot water. This design is more efficient than a tankless coil system because the appliance doesn’t have to fire as often, which is an energy-intensive process. Also, since there is no burner on the storage tank you can add extra insulation to the tank to save energy.
A tankless coil system has an extra heat exchanger that fits into the appliance. Water is heated when it flows through the heat exchanger. Tankless coil systems are most efficient when the appliance is already being used for space heating. During summer months, however, the on-off cycling that occurs every time domestic hot water is needed can waste energy. To avoid this, some homes use a tankless coil system during the winter and a separate domestic hot water system during the summer.
Winter Punch List
Winter is looming, but there is still time to attack a fall home maintenance punch list before it gets too cold. In addition to a boiler tune-up and chimney inspections, there are a few more details worth considering.
Now is the best time to make sure your roof system is in good working order. It’s not too late to replace shingles, add snow stops, patch leaks, or replace any missing fasteners on metal roofs. Now that the leaves are down, the gutters are ready for inspection. In the spring, gutters clogged with frozen debris are virtually impossible to clean and can cause melt water to overflow and run down next to the foundation and into the basement or crawlspace. Check the downspouts too. They should be unobstructed, firmly attached, and pointed to direct water away from the house. While you are walking around the house, check the grade for drainage. Surface soils will remain unfrozen for a little longer so it’s not too late to do any last minute dirt work to ensure spring run-off is directed away from the house. Inspect any heat traces to make sure they are in good (and safe) working order. Replacing a heat trace now is a lot less hassle than a frozen waste or supply line in the winter. If you have any concerns about the safety of a heat trace – particularly if it’s older—consult a professional. A malfunctioning heat trace can be a fire hazard.
If you have an HRV system, make sure all parts of the system are in good working order. Alaskans tend to spend a lot more time indoors during the cold periods, and good ventilation is critical. An inspection should include a look at the supply and exhaust grilles on the outside of the house – not just those belonging to the HRV, but also dryers, range vents, and bathroom fans, especially if they are close to the ground where the intake can become clogged with leaves, grass, or other debris. If an exhaust damper is present, make sure it is operating smoothly. Open up the HRV and examine both the filters and the core. The cores can be removed and washed out if they’re dirty. The condensate drain and drain line under the HRV should be free of obstructions; if a trap is present, it should contain water. A properly installed HRV is designed to bring in and exhaust the same amount of air. The system should provide enough fresh air to ensure occupant health and control humidity but not over-ventilate, as excess air flow is simply wasted energy. If you’ve never had your system professionally balanced and inspected, now is the time.
If you’re planning any air sealing with spray foam, the cut-off temperature for most expanding foams is above freezing, although a few brands may go lower. Last but certainly not least, make sure your home has operating smoke alarms and at least one operating carbon monoxide detector.
How long does firewood take to dry in the Interior?
Wood-burning practices have come under scrutiny in recent years as the Fairbanks area has been cited for poor air quality by federal regulators. Increased wood-burning, a low-cost alternative to heating oil, has led to elevated levels of PM 2.5, a range of particulates linked to respiratory problems.
In an effort to lower emissions, the borough set fines for burning wet wood. But that’s not the only reason to burn dry wood–it also produces more BTUs.
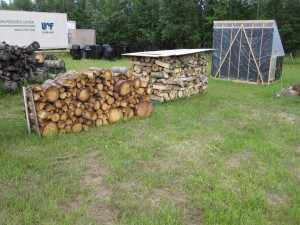
How long does it take to fully cure firewood (a moisture content of 20 percent or less) in this climate? It depends on the species of wood, when you harvest it, whether you split it and how you store it. A study at CCHRC shows that wood can dry rapidly over the summer—no matter when it’s harvested—but not over the shoulder seasons or winter. That means firewood harvested in the fall won’t be fully cured by that winter.
Split wood harvested in the spring took anywhere from six weeks to three months to dry over the summer, depending on the storage method. The fastest way to dry split wood was by storing it in a wood shed or leaving it uncovered, although uncovered wood is at the mercy of the weather and could be wet again by fall. When stored under a tarp, the wood took approximately three months to cure.
Unsplit wood, on the other hand, didn’t cure completely over the summer in any storage scenario. Though it had dried significantly by the end of the summer, it required another summer to reach a full cure.
Firewood harvested in the fall didn’t cure by springtime no matter how it was cut or stored. While it dried out somewhat in a wood shed (to between 30 and 40 percent moisture content) some samples actually got wetter under a tarp over the winter.
Several other factors should be considered when seasoning your wood. Spruce and birch tend to dry more quickly than aspen. And your drying times will also vary based on exposure to sun and air circulation (the more, the better).
The good news is that it’s possible to harvest firewood in the spring and cure it over a single summer—so you can stay cozy and burn cleanly over the winter.
I’ve heard stack effect can cause problems with indoor air quality. How is this possible?
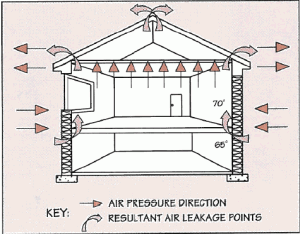 Stack effect (also called chimney effect) involve the air flow into, out of, and through a building. This air flow can produce some unwelcome side effects. An enclosed heated building in winter will have different air pressures at different heights (the result of differences in air density caused by of differences in indoor and outdoor temperature). To complicate matters, a taller structure such as a multi-story house will contain a taller column of air with greater pressure differences.
Everything starts with the fact that warm air rises and cold air sinks. Inside a home this means that warmer air moves towards the upper regions near the ceiling, producing positive air pressure at the ceiling level. It doesn’t end there though, because what’s going on outside the house influences the air pressures inside the house. When it gets very cold, the outside air is much denser than the heated indoor air. As a result, the positive pressure in the upper regions of the house can increase dramatically. Things are fine, however, until you have an air leak somewhere in the positive pressure zone. At this point, the warm air will rapidly exit the house through the leak. As warm indoor air leaks through the walls or roof, it cools and deposits moisture along the way and loses heat. It doesn’t stop there. New air to replace the air lost must come from somewhere. Replacement air will tend to take the path of least resistance. Typically air is drawn in through the lowest regions of the house, which is why problems with soils gases, such as radon, tend to increase in winter. Replacement air isn’t always just drawn in through the lower parts of the structure. Air can also come through poorly sealed or malfunctioning combustion appliances such as wood stoves and boilers.
The key to reducing potential problems with stack effect is good air sealing around penetrations in the building. If you are considering sealing air leaks in your house, it’s very important that you start at the top. If you start at the bottom, then you are potentially increasing the chances that the air leaking out of the top will pull air from other sources such as combustion appliances. Always be sure that you have a functioning carbon monoxide detector in your home and that your boiler and wood stove have a dedicated source of combustion air.
