Tag Archives: cold climate

What are Vacuum Insulated Panels?

Vacuum insulated panels, or VIPs, are a relatively new product making their way into buildings in the United States.

They can be used as stud cavity insulation or as continuous exterior insulation on structures, just like other types of insulation.

As the name describes, VIPs consist of a panel with the air inside of it removed to form a vacuum. It isn’t a perfect vacuum, but the air pressure inside the VIP is considerably less than ambient pressure. The panels are airtight and resistant to water vapor absorption. They make good insulators because the lack of air almost completely eliminates conductive and convective heat transfer through the center of the panels. Typical panels are fairly small, 1 x 2 feet or 2 x 4 feet, and about 1 inch thick.

VIPs have an R-value of approximately R-25 per inch at the center of the panel and about R-20 for the whole panel (exact R-value depends on the manufacturing process and materials). The center of the panel will have a higher R-value than the edges, much like a window, as edges provide a thermal bridge for conductive heat transfer and lower the R-value of the entire panel. Even the whole-panel R-value is considerably higher than other insulations: fiberglass batts are around R-3.8 per inch, EPS is around R-4 per inch, and XPS is around R-5 per inch.

VIPs are installed on the sheathing plane of a building using adhesive. The material surrounding the VIPs in a wall is very important, because it helps protect the VIP from damage during installation. However, because the VIP is not continuous, the lower R-value surrounding insulation will bring the total wall R-value down. This is similar to what happens in a traditional stud-framed wall with fiberglass batts in the cavities — the wooden studs provide a thermal bridge for heat to escape and reduce the total wall R-value. With VIPs, even if the “studs” were made of EPS insulation, the whole wall R-value will still drop more than the fiberglass wall drops with the addition of wooden studs. It is important to consider how to provide structure for VIPs without providing too much thermal bridging.

As with any new building product, there are potential disadvantages of using VIPs that must be considered. First, VIPs must be manufactured in a factory and then shipped to the building site.

They can’t be cut or modified in the field. This means that detailed plans must be completed prior to construction and there is no flexibility in modifying them, unlike a traditional stick-framed wall.

VIPs also cost quite a bit more than other types of insulation. In addition to the more intensive manufacturing process, the panels have to be shipped to the building location.

There are currently only a few manufacturers in the United States, so this could be quite a long distance.

Finally, panels will naturally lose some vacuum over time. When they do, the R-value drops substantially. Manufacturers currently estimate the lifespan of the vacuum at 25 to 50 years. The seals must be treated carefully during the shipping and installation process to protect the vacuum. And putting a nail through a VIP damages the R-value of the panel much more than with other types of insulation. Losing the panel vacuum due to a hole in the panel reduces the panel’s R-value by more than half, often bringing it down to around R-6 per inch.

VIPs in Alaska

VIPs have a number of applications throughout the world, including refrigeration equipment, vending machines, shipping containers and construction. A few companies are manufacturing them in the United States, including Nanopore and Dow Corning. The new engineering building at the University of Alaska Fairbanks will use Dow Corning VIPs in a test wall system, which consist of fumed silica (basically glass powder) wrapped in a layer of plastic and aluminum. In effect, the plan is to replace some EPS foam in the wall system with a small vacuum panel. UAF researchers are planning to measure the installed R-value of the panel to study its appropriateness for buildings in our climate.
Moisture Performance of Cellulose Insulation

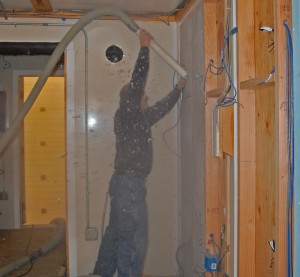
Blowing dense-pack cellulose insulation into the test walls.

Blowing dense-pack cellulose insulation into the test walls.

Building envelopes have a hard job in Interior Alaska—keeping us warm, dry and healthy at 40-below. CCHRC tests a variety of building designs and products to see how they can be applied in this environment. We recently studied the moisture performance of cellulose insulation to see how it compared to other common types, like fiberglass and rigid foam, and how it performed in a super-insulated house.

First, let’s look at a conventional wood-framed wall with 2×6 or 2×4 studs and an interior vapor barrier. This system has historically worked in the Interior because the vapor barrier limits the moisture allowed into the walls and moisture that does sneak in remains frozen through most of the winter. During the spring, the walls thaw and dry to the outside.

But when you add exterior foam insulation to a house, a common retrofit technique to save energy, the walls can no longer dry to the outside. Is this good or bad for the wall? Depends on how much you add. If you add enough exterior insulation (for example, six inches of EPS foam for a 2×4 wall) the sheathing and framing will stay warm enough to avoid condensation, improving your overall moisture control. If you don’t add enough, however, you move your wall sheathing into the danger zone—above freezing and very humid.

We’ve learned from earlier studies how to use fiberglass and EPS and XPS foam in various wall systems to improve energy efficiency while avoiding moisture problems (See cchrc.org/safe-effective-exterior-insulation-retrofits). This latest study looked at how cellulose performed in different wall scenarios over an 18-month period. These were not standard walls—they intentionally lacked a vapor barrier because we wanted to force moisture into the walls.

Cellulose insulation is made primarily of recycled paper. As a local, rather inexpensive product, it has recently become more popular in building in Interior Alaska. “Dense-pack” cellulose is blown into a wall to a density of 3.2 pounds force per cubic foot, which is designed to prevent the insulation from settling over time. Dense-pack cellulose has an R-value (or insulation value) of 3.7 per inch—slightly higher than fiberglass batts and slightly lower than EPS foam.

Our study shows that cellulose can handle moisture better than fiberglass or EPS insulation when used properly. The test wall that used cellulose as both interior and exterior insulation maintained lower humidity levels (and was less likely to condense or grow mold) than the test wall that used interior fiberglass and exterior foam.

That can be partly attributed to material properties of cellulose. Dense-pack cellulose is actually less permeable to air flow than fiberglass batts. So when used as interior insulation, it reduces the amount of moisture that migrates into the stud cavity.

Cellulose also has the ability to absorb and release water vapor, allowing it to moderate moisture levels within a wall and prevent the large spikes in relative humidity that cause moisture damage.

It’s also more permeable to water vapor than EPS or XPS.  The test wall with exterior cellulose had lower humidity levels than the wall with exterior foam, because it allows faster drying to the outside.

Based on this study, dense-pack cellulose can provide a good option for exterior insulation beyond rigid foam board. In future studies we plan to look at the minimum amount of exterior cellulose needed to keep the sheathing warm and dry.

What are Structural Insulated Panels and considerations for Alaska

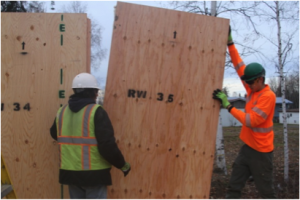
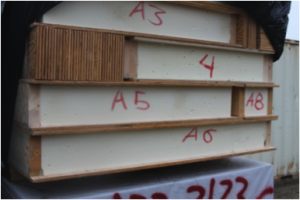
SIPsStructural Insulated Panels, or SIPs, are prefabricated building panels that combine structural elements, insulation, and sheathing in one product. SIPs can be used for the walls, roof and floor of a building in place of more traditional construction methods, such as stick-framing. A SIP typically consists of a foam insulation core with a structural sheathing panel bonded to both faces. Sheathing panels are usually made of industry standard OSB or plywood.

Building with SIPs


Constructing a home from SIPs begins at the design phase: builders must work with the SIP manufacturer since the panels are specific to the design. Once the plans are finalized, the SIPs are made and shipped to the job site. The panels are labeled so builders know exactly where each panel goes in the building.

As they are erected, the panels must be joined together according to manufacturer specifications. For instance, many panels are joined with splines that are secured with screws. When the structural connections between panels are being made, workers must take care to seal the joint between the panels to ensure it remains airtight. Air sealing the panel joints can be accomplished using sealing agents such as caulk, adhesive, mastic, spray foam or tape. A tight seal is also necessary in order to prevent moisture from entering the panel, which can lead to structural deterioration of the panel components over time. Some building inspectors may require a 6mil polyethylene sheeting vapor retarder be installed on the interior side (warm side) of the SIPs once the panel construction is completed.

SIPs2

Electrical outlets and wiring are usually installed into recesses and holes pre-cut into the panels, both on the interior and the exterior as needed. Any special considerations for running electrical systems or other mechanical penetrations through the SIPs should be addressed with the manufacturer during the design phase.

Benefits and Concerns

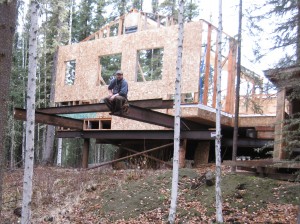
There are several potential benefits to building with SIPs. For one, the absence of an air permeable wall cavity prevents convective heat losses from occurring within the panels. Large panels will have fewer framing members than a stick-framed wall, which reduces heat losses due to thermal bridging. With a trained crew, SIP buildings can be erected quickly, a big advantage in climates with short building seasons. Properly constructed, a SIP panel home can realize a high level of air tightness and energy efficiency.

On the other hand, builders must take extra care to ensure proper assembly and sealing to prevent any problems due to moisture infiltration and air leakage. Builders also do not have much flexibility in on-site design changes, since panels come pre-cut. An experienced builder who can work through a home design with the manufacturer and who doesn’t cut corners with sealing panel joints is a necessity.

SIPs can be either cost-effective or cost-prohibitive depending on the situation. The design services and shipping costs may drive the price of SIPs above that of conventional framing materials. However, this can pay off in reduced labor costs if a trained crew erects a building quickly, or if several buildings of the same design are being erected.

Egress and Home Safety

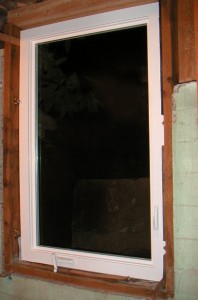
MINOLTA DIGITAL CAMERAEgress is a means of emergency escape. Not surprisingly, all houses need egress for events such as a fire, and emergency egress is required by the International Residential Code for residential buildings. The IRC requires a form of egress in basements and rooms where people sleep. Each bedroom must have its own emergency exit.

While egress could be a door opening to the outside, it is most commonly a window, and the IRC specifies minimum requirements for egress windows. For one, an egress window needs to open to a public street, alley, yard or court. Also, the window must meet minimum size requirements so people can exit. The minimum size is 5.7 square feet, unless the windowsill is on the floor, in which case the minimum is 5 square feet. The window must be at least 2 feet tall and 20 inches wide. Meeting the minimum height and width requirements doesn’t guarantee meeting the minimum area, so the window will have to be larger in at least one of those dimensions.

Finally, the window cannot be more than 44 inches from the floor, and people must be able to open the window without any special tools or knowledge. Window coverings, such as a screen or bars, are OK, but people need to be able to remove them without any special force, tools or knowledge.

Basements are often located below grade, or below the typical ground level. Since egress windows in basements wouldn’t do much good opening to soil, a window well is required outside the window. The window well should be large enough for the window to open fully, and also should contain a ladder if the well is more than 44 inches deep. Of course, the IRC specifies well and ladder dimensions if this situation applies to your home.

Does your house have emergency egress? Some older homes built before the IRC requirements do not. A means of egress is sometimes overlooked during remodels — for example, converting a space to a bedroom that was not initially planned for that use. If you have a room that does not meet the minimum egress requirements, there are many reasons to correct the problem, the most important being providing a way to exit a house safely in an emergency.

Adding egress windows in required rooms will allow your house to pass inspection should you decide to sell it and will add value to the home as well. Sometimes, adding or replacing windows can become a major project, and it must be done correctly to avoid air leakage and drainage problems later. If you need to install egress windows, find a contractor familiar with the building code and who will take the time to properly install energy efficient windows that meet the requirements.

New videos on mitigating radon in your home

How to mitigate radon in new construction

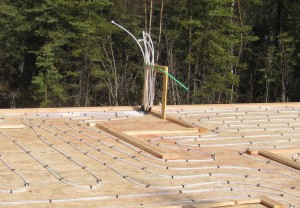
The hilly areas containing fractured schist and rock around Fairbanks are known for having high concentrations of radon. A good radon mitigation system will ensure healthy indoor air quality. Your single best chance at dealing with radon issues is during new construction.

In this video, Ilya Benesch, building educator at the Cold Climate Housing Research Center, demonstrates the essential steps of installing a radon mitigation system for a slab-on-grade foundation.

The video follows EPA guidelines for installing radon mitigation systems found here:

http://www.epa.gov/radon/pdfs/buildradonout.pdf


Examining a radon mitigation system

In this video, Ilya Benesch visits a construction site and explores how the contractor has installed a radon mitigation system.


The project was funded by the University of Alaska Fairbanks Cooperative Extension Service. For more information about radon, visit: www.uaf.edu/ces/energy/radon.


How do I keep dust, smoke and other particulates out of the house?

A house should manage indoor air quality by regularly exchanging stale “used” indoor air with fresh outdoor air. You also can improve indoor air quality by avoiding unnecessary sources of contamination, such as restricting smoking to outdoors, storing fuels outside, and selecting low-VOC paints and furnishings. During the year, the air in the Interior can contain particulates from wildfires, wood smoke, dust, pollen, car exhaust and other sources that cause you to shut the windows. That’s where filtration systems can help.

Air filtration options

When it comes to indoor air filtration, the best choice for you depends on many factors, including the size and tightness of your house, your existing ventilation system, your sensitivity, and the amount of particulates and other contaminants in the air.  Be aware that irritating and harmful particulates don’t just come from outside but also inside — sources like tobacco smoke, animal dander and mold spores. Other contaminants include gases in paints, carpets, cleaners and other household products. The most common filtration systems are mechanical and target particulate matter. Prices range from about $200-$300 for a one-room portable filter to $6,000-$8,000 for a heat recovery ventilator installation with filtration.

Standalone filtration

The simplest system is a standalone air purifier, which contains a fan and filter elements all in one unit and can be plugged into the wall. These systems are designed to be portable and recirculate air in a single space, and will reduce pollutants like allergens, pet dander and dust from that space. These work well in homes where air quality problems are isolated to one or two areas.

Multiple room air cleaners

Air filtration systems that can serve multiple rooms or even the whole house typically cost more and will require an in-line fan and ductwork, but tend to be more effective.

Keep in mind that whether large or small, filtration systems by themselves don’t introduce fresh outdoor air, but they can provide air cleaning and heat distribution. Whole house systems may be a good option for those with bad allergies or respiratory problems.

Many homeowners who heat primarily with wood install small circulation systems, with an in-line fan and ductwork in just a few rooms to move heat around the house, said Richard Musick, of Ventilation Solutions LLC. The size of the fan is based on how much air you want to circulate.

“If it’s only a couple of rooms, you can get away with a 200 cfm (cubic feet per minute) fan. Big houses can require up to 900-1,500 cfm,” Musick said.

Heat recovery ventilator filtration

While new HRV systems often have high levels of built-in filtration, older models are generally only equipped with coarse debris filters whose primary purpose is to keep the core and motors clean. To help ensure good air quality, a simple filtration system can be attached separately in line with the warm-side supply port on the HRV. All the HRVs at CCHRC have a prefilter to catch the big particles, a main particle filter to catch small particles, and a carbon filter to remove odors, aerosols and VOCs. These filters can be found at HVAC and hardware stores, and are inexpensive and easy to replace. Note that the carbon filters typically need to be replaced more frequently than other air filters.

Rating

Filtration systems are measured by a MERV rating — or minimum efficiency reporting value — which goes from 1 (traps bigger particles) to 20 (traps the smallest particles). You pick a MERV rating based on what you’re trying to filter. For example, MERV 1-4 will take care of pollen, dust mites, and most animal dander, while you’ll need at least MERV 13-16 to filter out smoke particles. HEPA (high efficiency particulate arresting) is in the 17-20 range, removing more than 99 percent of tiny particulates such as carbon dust from the air.

Typically MERV 15 represents the upper limit for residential HRV systems as anything finer may restrict too much airflow. The EPA Office of Radiation and Indoor Air notes that filters with MERV ratings between 7 and 13 are capable of reducing unhealthy particulate matter almost as well as HEPA filters. Additionally, activated carbon filters can be used to neutralize smoke and VOCs.

House tightness

Homes built today are more energy efficient with better insulation and higher levels of air tightness than many of the homes built in previous decades. Building codes now require mechanical ventilation systems for all new residential construction in most if not all northern states. This is simply because uncontrolled air leakage can no longer be counted on to provide the fresh air needed to keep a home healthy. Generally speaking, the highest performing ventilation systems available today will include balanced and regulated fresh air exchanges, in combination with air filtration.

No matter what system you get, check to see what type of replacement filters are required.  Some models may use proprietary filters that are more expensive to replace or have more limited filtration capacity.

What should I be aware of when building on permafrost?

If pilings are used on permafrost, they must be installed to a depth that will both support the structure and resist frost jacking due to seasonal ground movement.

Permafrost is loosely defined as soil and/or rock that remains frozen for more than two years. In the Fairbanks area, permafrost tends to be discontinuous and is concentrated primarily on north-sloping hills and in lower elevations with heavy ground cover. Big trees do not guarantee the absence of permafrost; it might just mean that permanently frozen ground or ice is down far enough that the soils in that spot can support a larger root system. The only way to be certain of what the ground contains is to have a soils test drilling done.

With permafrost, the safest bet is to it avoid it altogether and move to another piece of land. This is easier said than done, particularly because of the scarcity of buildable land near Fairbanks that is affordable. If you decide to build on permafrost, be as strategic as possible. Smaller and simpler structures will tend to fare better than larger, more complicated ones.

Minimal site disturbance is the accepted practice. The trees and the ground cover are your best friend. They protect and insulate the ground from the heat of the summer. A great example is the green moss you find on many of the shaded low-level areas in Fairbanks. Moss has a high insulating value, and in many cases if you dig down a couple of feet, the ground might still be frozen in the middle of summer.

Strategies for construction on permafrost include:

• As a general rule, the organic layer of ground cover provides insulation and should not be removed, as this will increase the risk of thawing any frozen ground underneath.

• Elevate and properly insulate the bottom of your house to prevent heat losses through the floor system from reaching the ground underneath, which can lead to thawing.

• In post and pad construction, use a thick gravel pad that is significantly wider than the house itself (also insulated if possible) to stabilize the ground and spread building loads.

• If wood or steel piles or helical piers are used, they must be installed to a depth that will both support the structure and resist frost jacking from seasonal ground movement.

• Cut trees sparingly to maximize site shading (while permitting for a fire break).

• Build a wrap-around porch, which will help shade the ground around and underneath the house.

• Incorporate large roof overhangs to shed water away from the house and provide shade.

• Install gutters and manage site drainage well away from the house.

• Retain an engineer familiar with local soils conditions to assist in designing a foundation system that will adequately and safely support your home on the soils specific to your site.

• Septic systems also must be engineered to function on permafrost, and remember that conventional systems might risk thawing the ground.


Other Resources 


Permafrost Technology Foundation case studies: http://www.cchrc.org/permafrost-technology-foundation-library

U.S. Permafrost Association website: www.uspermafrost.org/education/PEEP/ptf-manuals.shtml

UAF Cooperative Extension Service online publications at www.uaf.edu/ces.


Glycol not always best for hydronic systems

Adding glycol to your hydronic heating system is one way to boost the frost protection of your heating system, but first consider if it’s a good match for your system.

Every winter, several days of sustained cold temperatures tend to produce their share of frozen pipes. In the long term, the best way to protect water pipes is by addressing the source of the problems rather than the symptoms. This means insulating and air sealing the walls, floor, foundation or other cold spots that are putting those pipes at risk in the first place. If necessary, consider rerouting water lines to ensure they stay in heated space.

When it comes to the hot water (hydronic) heating system, solutions may not present themselves as readily. In many instances the piping may be inaccessible such as in concrete slabs, or the freezing risk may be too great if a mechanical breakdown occurs. In such cases, bolstering a heating system’s frost protection with glycol may present the best option. Although glycol is quite effective at keeping pipes from freezing, its use does have some important considerations as it has properties that differ from those of water.

For residential heating systems, propylene glycol is most often used as it is non toxic and environmentally friendly. Even so, make sure the glycol is compatible with your particular system and that it contains the proper additives. Typically, an experienced plumber will perform an inspection and decide what changes your particular heating system may require to make it compatible with glycol. Water hardness, the presence of chlorine and other impurities, and the metals used in the system (such as aluminum), can alter the system requirements and the additives in the glycol.

In some cases, a system where glycol has been added may experience weepage. Simply put, this means that marginal areas such as weak solder joints, pipe threads and other fittings that didn’t leak before may experience some leakage with glycol in the system. If leaks occur, they will need to be addressed. Fluid treated with glycol will expand to a greater degree and your expansion tank may need to be upsized. Also, since glycol does not transfer heat as well as water, depending on the amount in the system, this may result in a noticeable loss of system efficiency and a corresponding increase in heating cost. Ideally, glycol should be tested every year or two to ensure that its performance hasn’t degraded. Test kits are available at plumbing stores, or a plumber can test the system as part of routine boiler maintenance. In a properly operating system, glycol can last 10 years or more.

Along with the considerations mentioned above, glycol is an investment and introducing it into a system carries significant expense. Consequently, not every home may see the benefit and many have done fine without it for years, however there are times where it is the best solution for freeze protecting a heating system. Because every case is unique, what matters most is an experienced plumber is there to judge, inspect, and if needed, add glycol to the system to ensure the best possible performance with the fewest complications.

What are HRVs and how do they work?

Heat recovery ventilation (HRV) systems are becoming increasingly common in cold climate construction and are almost indispensible in today’s super-insulated, airtight homes. As older homes are receiving energy retrofits and becoming tighter and more insulated, they are facing the same indoor air quality issues you find in new construction. HRVs improve the indoor air quality of your home and save more energy than other types of ventilation. This article provides an overview of the basic purpose and advantages of HRVs.

The main job of the HRV is to supply fresh outdoor air to the house while expelling stale indoor air — which can contain things like moisture, animal dander and gases from combustion appliances and carpets. This is especially important in a home that is too tight to rely on passive air exchange.

At the heart of the HRV is a heat exchanger (often called a “core”) where exhaust air flows next to, but separate from, supply air. Here the cold incoming air is warmed by the heated outgoing air, recovering heat that would otherwise be lost. Most HRVs recover 70 to 90 percent of the heat, depending on the unit and controls, making it much more efficient in a cold climate than a simple exhaust fan that blows warm air directly outside. One of the newest and most advanced models is capable of recovering more than 90 percent of the heat from exhaust air.

The ducting of an HRV system typically supplies fresh air to bedrooms and living areas while exhausting humid air from bathrooms, kitchens, laundry rooms and crawlspaces. The HRV does not eliminate the need for a cooking fan, so a range hood still should be the main outlet for grease and smoke above the cook stove.

The HRV is designed to be balanced, meaning it takes in as much air as it exhausts, maintaining close to neutral pressure inside the home. It should not create a negative pressure in the home, like an unregulated exhaust fan might, which can cause appliances to back draft (suck in air from an exhaust flue and expose you to dangerous gases). It’s also important to remember that HRVs are not meant to supply air to combustion appliances.

Efficient residential units use about as much power as a 60-watt light bulb when running, and are getting more and more efficient. As with any appliance, an HRV requires some maintenance, such as checking the built-in filters every fall to see if they need to be cleaned or replaced.

In addition to providing reliable ventilation in a home, HRV systems can serve several other roles. You can install an in-line filter system on the warm-side supply air port that will filter particles and odors from the incoming air. For example, in the winter this can help keep particulate pollution (from wood-burning and other sources) out of your home.

With the right controls, an HRV can also work in recirculation mode, which distributes heat to hard-to-reach areas in the house (a big help for occupants using a woodstove). Although be aware that recirculation reduces overall fresh air exchange and can redistribute odors from unwanted areas in the house. If you own an older unit, a control upgrade may be a beneficial and cost-effective option.

While it may seem expensive up front, you should look at an HRV system as an investment in a healthy home and peace of mind. In this climate, indoor moisture can cause problems not just for the structure, potentially condensing in the walls and leading to mold and rot, but also for occupant health. An HRV will protect the occupants as well as the structure by removing excess moisture before it has a harmful effect.

If you’re thinking about purchasing a system, make sure you learn about the specifics and find an installer who is willing to educate you and stand behind their work.

How do I know if my boiler (or furnace) is the correct size for my house?

If you are thinking about purchasing a new boiler (or any other heating appliance) in the near future, make sure that you get one that is the optimal size for your house. Correctly sized boilers operate more efficiently and are able to keep your house at a comfortable temperature. A boiler that is too small will not be able to produce enough heat in the winter months, and a boiler that is too large will cycle on and off, wasting fuel, just like a car driving in stop-and-go traffic. Here are 3 ways to know if your current boiler is the correct size:

1) The rule-of-thumb: On the coldest day of the year, your boiler should run pretty much non-stop to keep the set temperature. Think of it as a car driving on the highway, getting a high miles-per-gallon since it doesn’t have to start and stop. If it does run non-stop, but your house does not stay warm, then the boiler is undersized. On the other hand, if you find your boiler cycling on and off during January’s coldest week, then you should consider getting a smaller boiler.

2) The calculations method: To determine what size of a heating appliance you will need, in addition to finding out information about what other energy upgrades you can make to your house, consider signing up for an energy rating. An energy rater will look at your entire house, measuring the air leakage rate with depressurization from doors and windows, checking insulation levels, assessing your heating system and checking for drafts. They will input this information into AKWarm, software maintained by the Alaska Housing Finance Corporation that calculates energy ratings. In a few weeks, you will receive the rating in the mail. It includes ways to improve the rating and other information on your house, such as the heating needs. An energy rating typically costs between $425-$550, but this will be rebated if you participate in the Home Energy Rebate Program (though you will likely face a waitlist for the rating). Visit the Alaska Housing Finance Corporation website for information on the rebate program and signing up for a rating: www.akrebate.com.

3) Do-it-yourself: The rating software AKWarm is available for free online. If you are computer-savvy and have a few hours to gather information on your house, you can use AKWarm to calculate your own unofficial energy rating. The software is available for download here: www.analysisnorth.com/AKWarm/AKWarm2download.html.