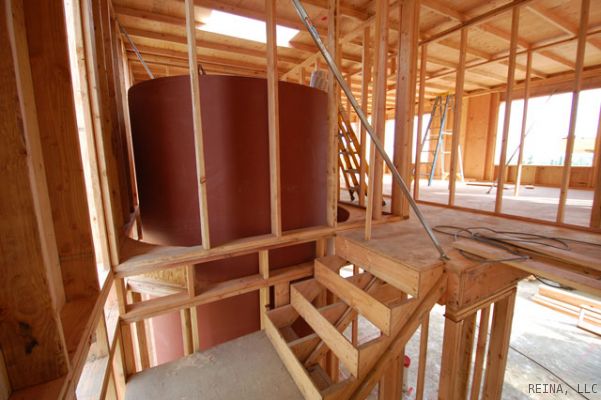
A 5,000 gallon tank acts as thermal storage in a home heated by a solar thermal system. Photo Courtesy Reina LLC.
CCHRC recently completed a study on how you can use thermal storage as part of your home heating system.
Thermal storage has recently gained interest in Alaska as it has the potential to increase the efficiency of heating appliances, enhance the use of renewable energy in cold climates, and reduce emissions of certain appliances like wood boilers. It is most suited for renewable energy systems such as solar thermal, geothermal and biomass, but can be adapted to a wide variety of heat sources. The report looks at different design considerations and describes several examples in homes around Alaska.
Thermal storage is a common concept. Many households use water storage tanks to provide domestic hot water, which can range from just a couple gallons to more than 100 gallons. Thermal storage also can be used in space heating systems to store heat for a certain period of time. For example, storing the heat from solar collectors in a buffer tank to use at night; storing heat from a wood boiler in a water tank to allow for a hotter, more efficient burn; or storing heat in the ground to harvest later with a ground source heat pump. In each case, thermal storage can be thought of as a “heat battery” because it holds energy to be used later. In this way, it can enable a heat source with intermittent delivery (like the sun or wind) to still meet demand.
Every thermal storage system needs three basic components: a heat source, a storage medium to store the heat (such as a tank of water, rocks or soil), and a discharge method (heat exchanger) to distribute the heat. Technically, any heat source can be used to charge a thermal storage material, however you should select the fuel and storage material based on availability, cost and compatibility with your home’s needs.
Also, many factors will drive the design of a thermal storage system for your home — such as your heating appliance, your distribution system, your heating demand, your lifestyle and many others. The design of the system also will depend on whether the system is being installed in a new home or being retrofitted into an existing one, as retrofits must accommodate the existing distribution system and available space in the home.
There are various applications of thermal storage throughout Alaska. A net-zero heating home built in Fairbanks several years ago uses solar thermal collectors and a masonry heater to charge a 5,000-gallon insulated water tank that provides heat to a radiant floor system.
The tank also heats domestic hot water in the house.
A different system, located at CCHRC, uses a wood-fired boiler to charge an insulated 1,500-gallon tank of water in the lab. The goal was to fire the boiler hot and fast, which produces more Btu and fewer emissions, and save the heat to use when it’s needed, rather than damping down the boiler so the fire lasts longer.
The water tank heats 1,900 square feet of lab space in the building. The tank was sized to hold as many Btu as the boiler could produce in one firing per day and to provide enough heat for the entire lab over a full winter day.
If you’re considering a thermal storage system, the first step is to consider what your goal is. Do you want to use renewable energy instead of fossil fuels? Are you looking for short-term (a few hours or overnight) or seasonal storage? Systems that are recharged daily are smaller and less expensive than seasonal systems.
Check out the report for an overview of various types of systems used in cold climates, case studies in Alaska, and tips for designing your own system.
Report: www.cchrc.org/docs/reports/thermal_storage.pdf