Tag Archives: Windows

Egress and Home Safety

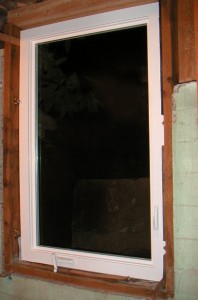
MINOLTA DIGITAL CAMERAEgress is a means of emergency escape. Not surprisingly, all houses need egress for events such as a fire, and emergency egress is required by the International Residential Code for residential buildings. The IRC requires a form of egress in basements and rooms where people sleep. Each bedroom must have its own emergency exit.

While egress could be a door opening to the outside, it is most commonly a window, and the IRC specifies minimum requirements for egress windows. For one, an egress window needs to open to a public street, alley, yard or court. Also, the window must meet minimum size requirements so people can exit. The minimum size is 5.7 square feet, unless the windowsill is on the floor, in which case the minimum is 5 square feet. The window must be at least 2 feet tall and 20 inches wide. Meeting the minimum height and width requirements doesn’t guarantee meeting the minimum area, so the window will have to be larger in at least one of those dimensions.

Finally, the window cannot be more than 44 inches from the floor, and people must be able to open the window without any special tools or knowledge. Window coverings, such as a screen or bars, are OK, but people need to be able to remove them without any special force, tools or knowledge.

Basements are often located below grade, or below the typical ground level. Since egress windows in basements wouldn’t do much good opening to soil, a window well is required outside the window. The window well should be large enough for the window to open fully, and also should contain a ladder if the well is more than 44 inches deep. Of course, the IRC specifies well and ladder dimensions if this situation applies to your home.

Does your house have emergency egress? Some older homes built before the IRC requirements do not. A means of egress is sometimes overlooked during remodels — for example, converting a space to a bedroom that was not initially planned for that use. If you have a room that does not meet the minimum egress requirements, there are many reasons to correct the problem, the most important being providing a way to exit a house safely in an emergency.

Adding egress windows in required rooms will allow your house to pass inspection should you decide to sell it and will add value to the home as well. Sometimes, adding or replacing windows can become a major project, and it must be done correctly to avoid air leakage and drainage problems later. If you need to install egress windows, find a contractor familiar with the building code and who will take the time to properly install energy efficient windows that meet the requirements.
How can I prevent window condensation in the winter?

Windows can be a barometer for how much humidity is inside the home.

Windows can be a barometer for how much humidity is inside the home.

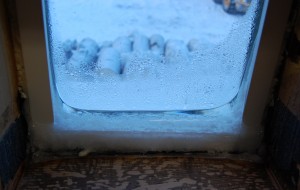
On really cold days, you may notice condensation forming on the inside of your windows. This can be caused by one or a combination of factors: excess humidity, inadequate ventilation, or poor windows. To understand and correct a particular issue in your home, you need to know some basic properties of moisture.

Condensation occurs when water vapor (a gas) turns into water droplets as it comes into contact with a cold surface. The point at which this happens (called the “dew point”) depends on the temperature and humidity of the inside air. The warmer the indoor air, the more water vapor it can “hold,” and moisture can better remain in the vapor state. When air moves next to a cold window, the temperature drops and it can’t “hold” as much vapor.  That’s when you start to see condensation forming.


For example, if the indoor temperature is 70 degrees and the outdoor temperature is 0, then moisture will begin to condense on a single-pane window when there is roughly 15 percent relative humidity in the house. A double-pane window will cause condensation at around 25-40 percent relative humidity, and a triple-pane window at between 30-50 percent.  These are rough numbers are based on average window insulation values.

The recommended indoor humidity levels for occupant health and comfort range from 30-50 percent. The general rule in a cold climate, however, is to target the lower end of this spectrum due to the risk of condensation within walls and ceilings. If your house has adequate mechanical ventilation, humidity is less of a concern. In Fairbanks, it’s tough to maintain anything close to 50 percent humidity in a properly ventilated house, because the winter air is so cold and dry.   Because of its low moisture content, the inherent dryness of Fairbanks winter air is good for homes but not always the occupants, since the dryness can cause discomfort.

What can I do about it?

Three things: make sure your home is properly ventilated, aim for less than 40 percent relative humidity to keep both you and your home healthy, and consider replacing your windows or adding moveable window insulation during cold months.

If you already use mechanical ventilation and have low interior humidity, but are still having problems, you may need to examine your ventilation setting. If you have a heat recovery ventilator (HRV), it may be recirculating too often, which can contribute to increased moisture build up in the air. Recirculation mode closes the connection to the outside and brings exhaust air back into the rooms.  Recirculation mode keeps the HRV core defrosted and saves energy, but sometimes it can run too long.  Some experimentation with the HRV settings may be necessary.   For example, in 20/40 mode the HRV brings in fresh air for 20 minutes and then recirculates for 40 minutes, and likewise for 30/30. If you’re getting condensation in your current mode, try decreasing the amount of time the unit recirculates.

Also make sure air is allowed to circulate—either passively or mechanically—throughout the entire house. If you close the door to the bedroom, the air can become cold and moist enough to condense on windows.

Older, poorer performing windows can create problems no matter what you do to your interior air. Bad seals around operable windows, metal spacers between the panes, and inadequate insulating value can cause the window surface to get cold enough for condensation to occur.  If you’re not ready to invest in new windows, consider some type of moveable window insulation like foam board (on the outside) or well-sealed plastic film (on the inside). A CCHRC guide to different types of window insulation can be found at

http://www.cchrc.org/evaluating-window-insulation.


How can I keep moisture and ice from forming on my windows in the winter?

Windows can be a barometer for how much humidity is inside the home.

On really cold days, you might notice condensation forming on the inside of your windows. This can be caused by one or a combination of factors: excess humidity, inadequate ventilation, or poor windows. To understand and correct a particular issue in your home, you need to know some basic properties of moisture.

Condensation occurs when water vapor (a gas) turns into water droplets as it comes into contact with a cold surface. The point at which this happens depends on the temperature and humidity of the inside air. The warmer the indoor air, the more water vapor it can “hold,” and moisture can better remain in the vapor state. When air moves next to a cold window, the temperature drops and it can’t “hold” as much vapor.  That’s when you start to see condensation forming.

For example, if the indoor temperature is 70 degrees and the outdoor temperature is 0, then moisture will begin to condense on a single-pane window when there is roughly 15 percent relative humidity in the house. A double-pane window will cause condensation at around 25-40 percent relative humidity, and a triple-pane window at between 30-50 percent.  These are rough numbers are based on average window insulation values.

The recommended indoor humidity levels for occupant health and comfort range from 30-50 percent. The general rule in a cold climate, however, is to target the lower end of this spectrum due to the risk of condensation within walls and ceilings. If your house has adequate mechanical ventilation, humidity is less of a concern. In Fairbanks, it’s tough to maintain anything close to 50 percent humidity in a properly ventilated house, because the winter air is so cold and dry.   Because of its low moisture content, the inherent dryness of Fairbanks winter air is good for homes but not always the occupants, since discomfort related to the dryness can be problematic.

What can I do about it?

Three things: make sure your home is properly ventilated, aim for less than 40 percent relative humidity to keep both you and your home healthy, and consider replacing your windows or adding moveable window insulation during cold months.

If you already use mechanical ventilation and have low interior humidity, but are still having problems, you may need to examine your ventilation setting. If you have a heat recovery ventilator (HRV), it may be recirculating too often, which can contribute to increased moisture build up in the air. Recirculation mode closes the connection to the outside and brings exhaust air back into the rooms.  Recirculation mode keeps the HRV core defrosted and saves energy, but it is also possible for it to run for too long.  Some experimentation with the HRV settings may be necessary.   For example, in 20/40 mode the HRV brings in fresh air for 20 minutes and then recirculates for 40 minutes, and likewise for 30/30. If you’re getting condensation in your current mode, try decreasing the amount of time the unit recirculates.

Also make sure air is allowed to circulate—either passively or mechanically—throughout the entire house. If you close the door to the bedroom, the air can become cold and moist enough to condense on windows.

Older, poorer performing windows can create problems no matter what you do to your interior air. Bad seals around operable windows, metal spacers between the panes, and inadequate insulating value can cause the window surface to get cold enough for condensation to occur.  If you’re not ready to invest in new windows, consider some type of moveable window insulation like foam board (on the outside) or well-sealed plastic film (on the inside). A CCHRC guide to different types of window insulation can be found at http://www.cchrc.org/evaluating-window-insulation.

Why look at the Whole Wall R-Value of your wall?

You might think you have R-40 walls, but have you factored in your studs and windows? With the recent emphasis on home retrofits and energy efficiency, many homeowners are defining their walls by R-value.

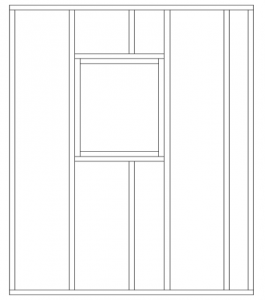
The whole wall R-value factors in the R-values of the insulated wall, stud, and window.

For instance, if you have 2×6 walls filled with fiberglass batt insulation (R-19), plus drywall and plywood, you probably consider your overall R-value to be R-21. But that only counts the insulated portion of the wall and ignores the weaker parts, such as windows, doors and structural framing (or studs), that provide primary paths for heat to escape. Just as water and electricity seek the path of least resistance, heat flows through the weakest thermal component of the wall assembly.

To see how much studs and windows affect the performance of your wall, CCHRC calculated the “whole wall R-value” for a hypothetical 2×6 house with 11 percent of the wall area taken up by studs (24-inch on center framing) and 15 percent taken up by double-pane windows.  The original R-21 wall is reduced to R-18.3 when you factor in the studs (R-8.8). And the whole wall R-value is further diminished to R-8.2 when you factor in windows with a U-value of 0.5 (standard double-pane windows).

How can this information help you improve the energy efficiency of your home? First, it gives an accurate picture of the overall thermal resistance of your wall. (Though there are many other components of a house that impact efficiency, such as the attic insulation, heating system, and ventilation system.) Second, it reveals the extent to which thermally weak points can counteract stronger points in your wall.

And third, it illuminates retrofitting options, each with their ups and downs. Replacing windows, for example, may achieve a greater whole wall R-value, but it can be pricey. Adding exterior foam, on the other hand, can be a cheaper way to cut heat loss through the insulated wall and the studs. But you must be careful to add the right amount of insulation, and possibly extra ventilation, to avoid moisture problems within the walls.

The best way to weigh these costs and benefits and make the most of your retrofit is first get a home energy audit.


Efficient windows offer more than a view

BY: Mike Musick, Cold Climate Housing Research Center
Energy Focus: Fairbanks Daily News-Miner August 7th, 2008, Section A3

A few days ago I received a phone call from a remodeling contractor who was very concerned that quite a number of Fairbanks residents were buying cheap slider type windows from one of the newer building supply stores.  He suggested that we issue a consumer warning on this issue.


I shared his concern regarding sliding windows having lived in an old home with single pane double-hung windows with exterior storm windows.  The windows were covered with ice until we learned to apply a shrink wrap clear plastic window kit.  This solved the icing problem but still allowed a lot of heat to pass around the perimeter of the windows.  This summer we replaced those windows with triple pane units with 2 low E coatings and argon gas in the two chambers.  We did a fair amount of research prior to making this investment.


Continue reading